
In May 2019 the Amsterdam studio The Fabricant sold a dress called Iridescence for $9,500 at an auction in New York[1]. The dress existed only as a 3D file.
The buyer, Richard Ma, bought it for his wife, Mary Ren, and she received a photograph of herself wearing it: the designers “digitally superimposed their creation onto an image of Ma’s wife”[2].
That photo was made by hand. From January 2021 to June 2023 I led machine learning research and development for a digital fashion product at a startup that is still in stealth. Our task was to make such photos automatically: a person uploads a photo, picks a garment and gets the photo back with the garment on.
This page describes the approaches we tried, the problems we ran into and the system around the models. The NDA covers the product, the data and the numbers, so the mechanics are shown on figures I made again from open models and data. The photos and the video are from the project.
The product
The product had three uses, shown on a slide from the project:
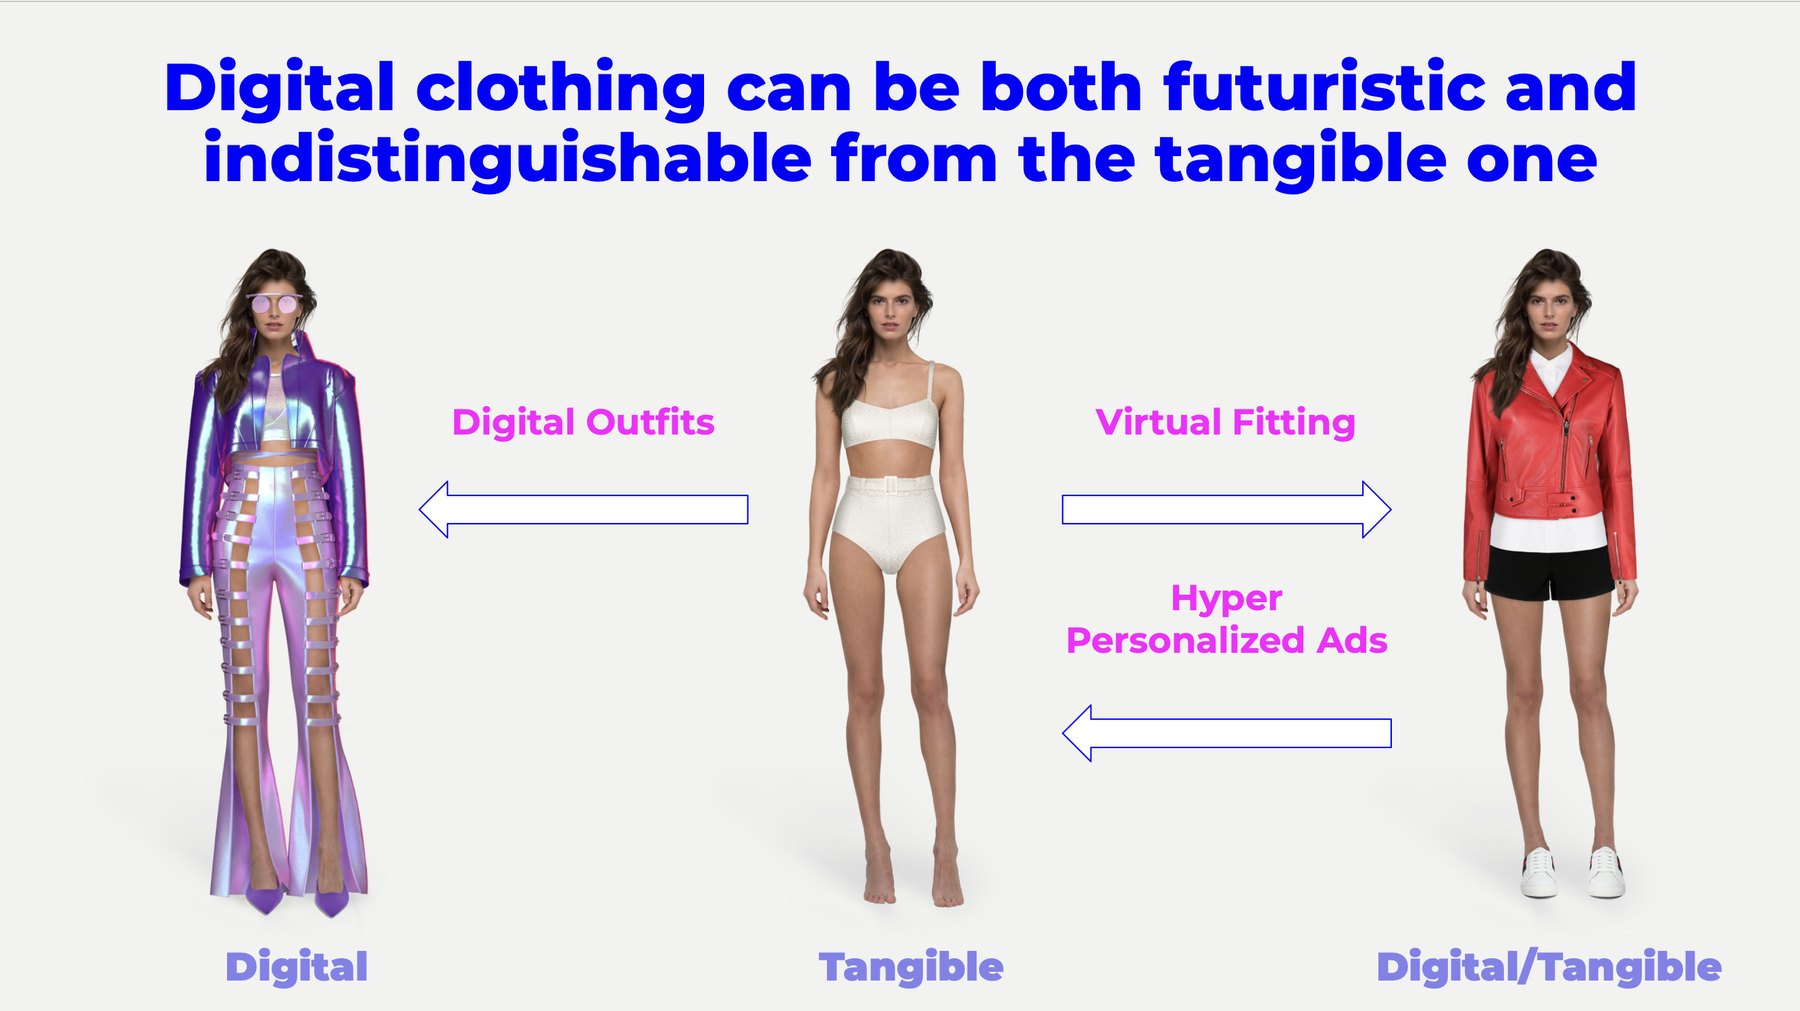
A slide from the project. Middle: the photo as taken. Left: an outfit that exists only as a 3D model. Right: real clothes, fitted virtually.
The first use was digital outfits: clothes that exist only as 3D models and are worn only in photos and videos. DressX, launched in August 2020, sold exactly that, “virtual looks that can be exclusively worn on photos and videos” (DressX).
The second was virtual fitting, where real clothes from a shop are shown on the buyer before the order. The third turned the second around: a shop’s ad shows its garment on the customer’s own photo instead of on a model.
In a shop’s app the first case looked like this: the user opens a digital outfit, taps Try now, picks a photo and gets it back with the outfit on.
The two main cases set different requirements. For a digital outfit the generated photo is the product, so what matters is image quality and the designer’s intent.
For virtual fitting the photo has to show how a real garment will fit, including when it is too tight or too long. Shops care about this because of returns: in 2022 size and fit were the most common reason for them, 45% of all returns[3].
Two approaches
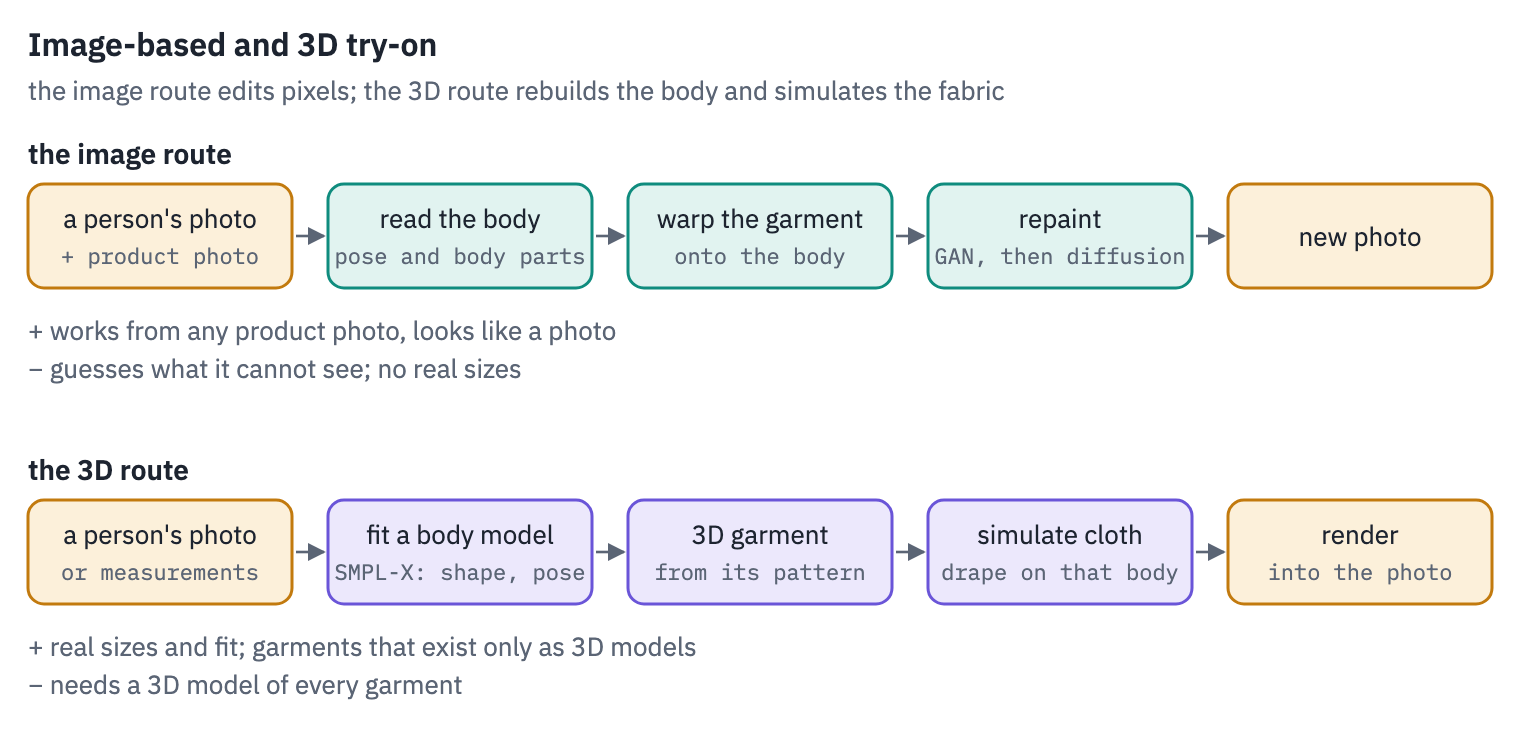
We worked on two approaches in parallel.
Image-based try-on treats the task as editing a photo. The system finds the body in the photo, bends the product photo onto it and lets a generative model repaint the region so that the result looks like one photograph.
It needs only the person’s photo and a product photo. It knows nothing about sizes: a size S dress will look fine on any body.
3D try-on treats the task as dressing a body. The system reconstructs the person’s body in 3D, puts a 3D model of the garment on it with a cloth simulation and renders the result into the photo.
It knows sizes and how the fabric behaves, but it needs a 3D model of every garment, and the render has to be made to look like a photo.
The 3D approach had a second purpose besides fit: digital clothing. Digital outfits are designed as 3D models and often could not exist physically: iridescent and transparent materials, shapes that nothing holds up, surfaces that glow.
A generator trained on photos of real clothes has seen little of this. A 3D garment can be draped and rendered with exactly the materials its designer chose.
Both approaches start from the same step: reading the person in the photo.
Reading the person in a photo
Keypoints, parsing and DensePose
Image-based try-on in 2021 ran three separate networks on each photo. The first finds the skeleton: OpenPose gives 25 body points in its BODY_25 model, feet included[4] (code), and BlazePose, made to run on phones, gives 33[5].
The second, a human parser, labels every pixel as hair, face, upper clothes, dress, left arm and so on. SCHP, trained on the LIP dataset with its 20 labels, was a common choice[6] (code).
The third, DensePose, goes further. It assigns each pixel of a person to one of 24 patches of the body’s surface and gives its position on that patch as two coordinates, U and V[7] (code).
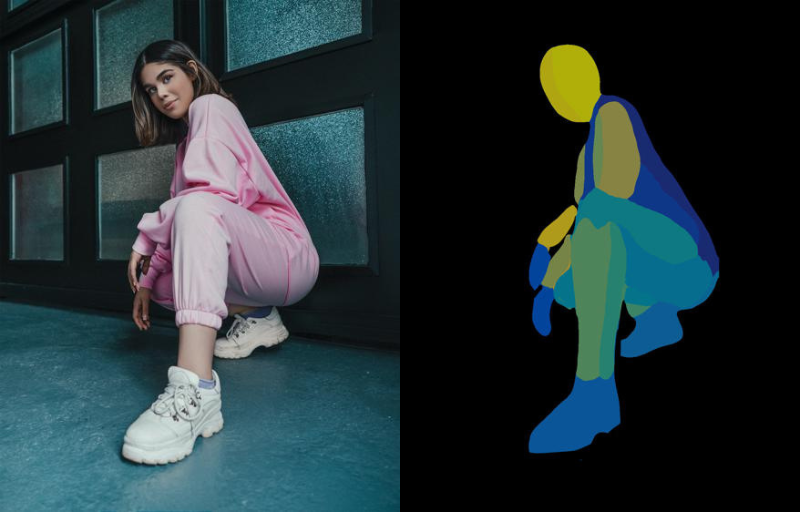
A photo from the project and its DensePose body-part map. Each colour is one patch of the body's surface.
The three networks answer different questions. Keypoints give the pose but not the outline of the body. Parsing gives the outline and the old clothes but not which part of the body a pixel shows.
DensePose gives each pixel a position on the body’s surface, which is what clothes are attached to: a sleeve follows the surface of the arm. In a pose like this crouch, the keypoints alone do not say which surfaces face the camera.
Parsing also finds the old clothes, which have to be removed from the input. If the person wears jeans and the new garment is a dress, the outline of the jeans must not reach the generator, or the dress comes out in the shape of the jeans.
Try-on papers build a “clothing-agnostic” representation of the person, which keeps the face, hair and pose and masks the clothes[8]. VITON-HD masks the arms too, because they “hint at the sleeve length”[9].
Pose and shape in 3D
For 3D try-on the 2D keypoints are only the input. The body has to be reconstructed as a 3D model in the same pose and with the person’s proportions.
The standard body model for this was SMPL: a mesh of 6,890 vertices controlled by a few numbers. Shape is usually 10 coefficients \(\beta\). Pose is 72 numbers \(\theta\): a rotation of three numbers for each of 23 joints and one for the body as a whole[10]:
\[M(\beta, \theta) = W\big(\bar{T} + B_S(\beta) + B_P(\theta),\; J(\beta),\; \theta,\; \mathcal{W}\big).\]The formula reads from the inside out. \(\bar{T}\) is an average body standing with its arms out. \(B_S(\beta)\) moves its vertices according to the shape, making the body taller, wider or heavier, and \(B_P(\theta)\) adds the corrections a pose needs, such as the bulge of a bent elbow.
\(J(\beta)\) places the joints inside this particular body. The skinning function \(W\) then rotates each vertex with the bones near it, in proportions given by the weights \(\mathcal{W}\).
SMPL-X (2019) adds hands and a face: 10,475 vertices and 54 joints[11] (code).
There were two ways to get these numbers from a photo. SMPLify fits the model: it detects 2D joints and searches for the body whose projected joints land on them, “minimizing an objective function that penalizes the error between the projected 3D model joints and detected 2D joints”[12]. It is accurate but slow, and where it ends up depends on where it starts.
HMR and ExPose regress instead. A network looks at the pixels and outputs the parameters in one pass, for SMPL[13] and for SMPL-X with hands and face[14]. SPIN made the two work together: the network’s guess is where the fitting starts, and the fitted result becomes training data for the network[15].
The hard part is depth. A photo shows each bone as a 2D segment. Even when its 3D length is known, the bone can point towards the camera or away from it and project onto the same two points[16].
With the eight long bones of the arms and legs, that gives \(2^8 = 256\) poses for one 2D skeleton. Models choose among them using what they have learned about real poses: which way knees bend, how people stand and sit.
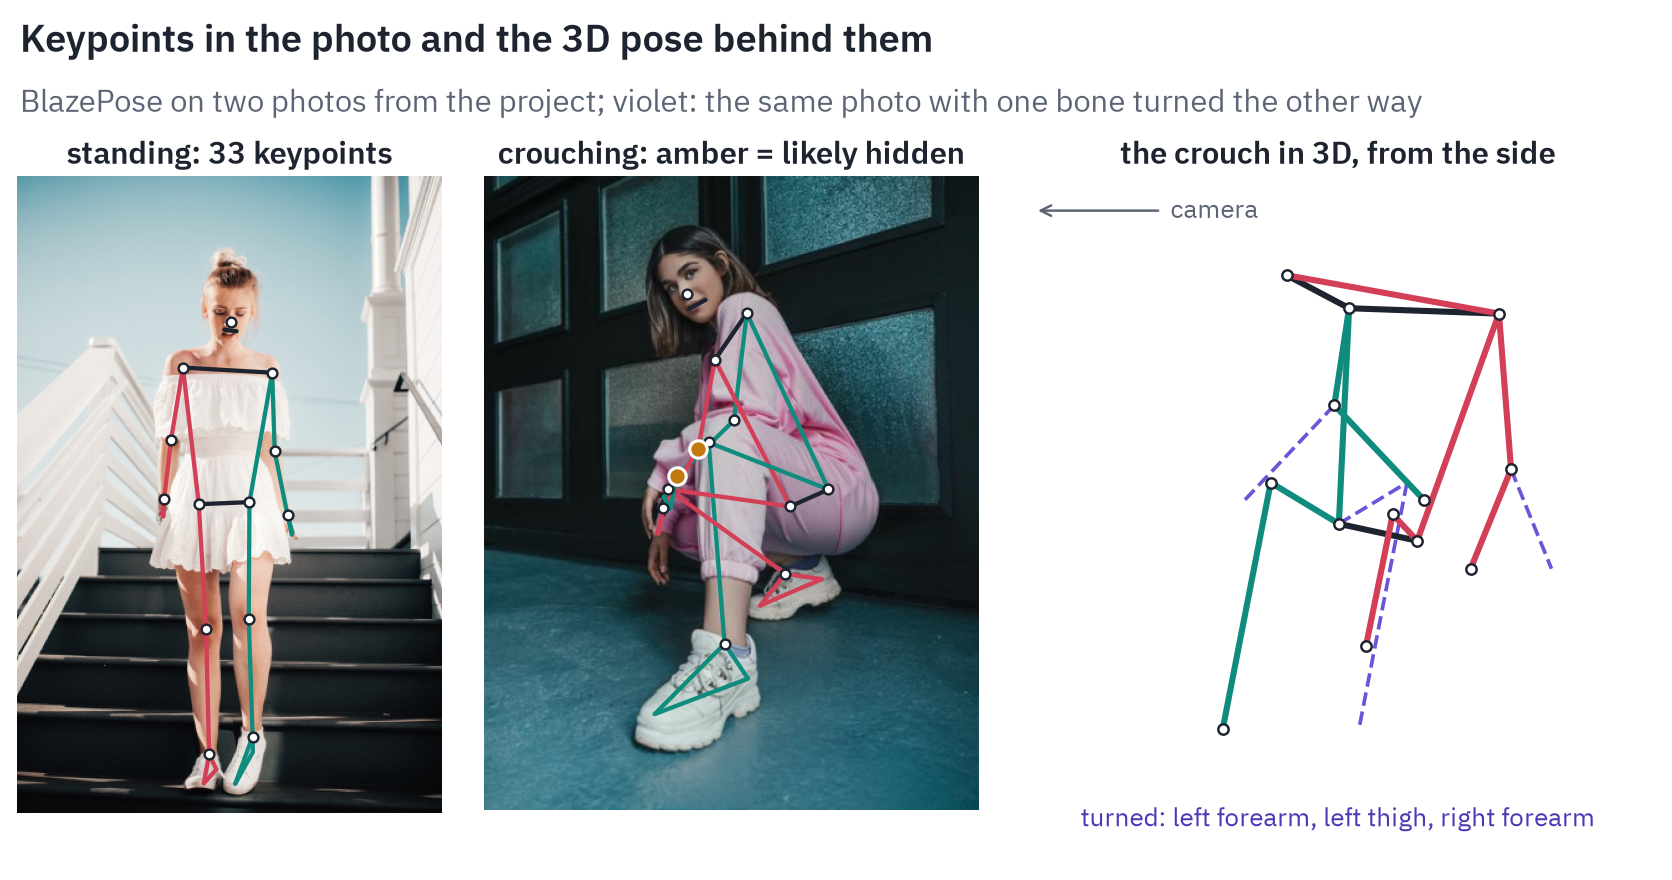
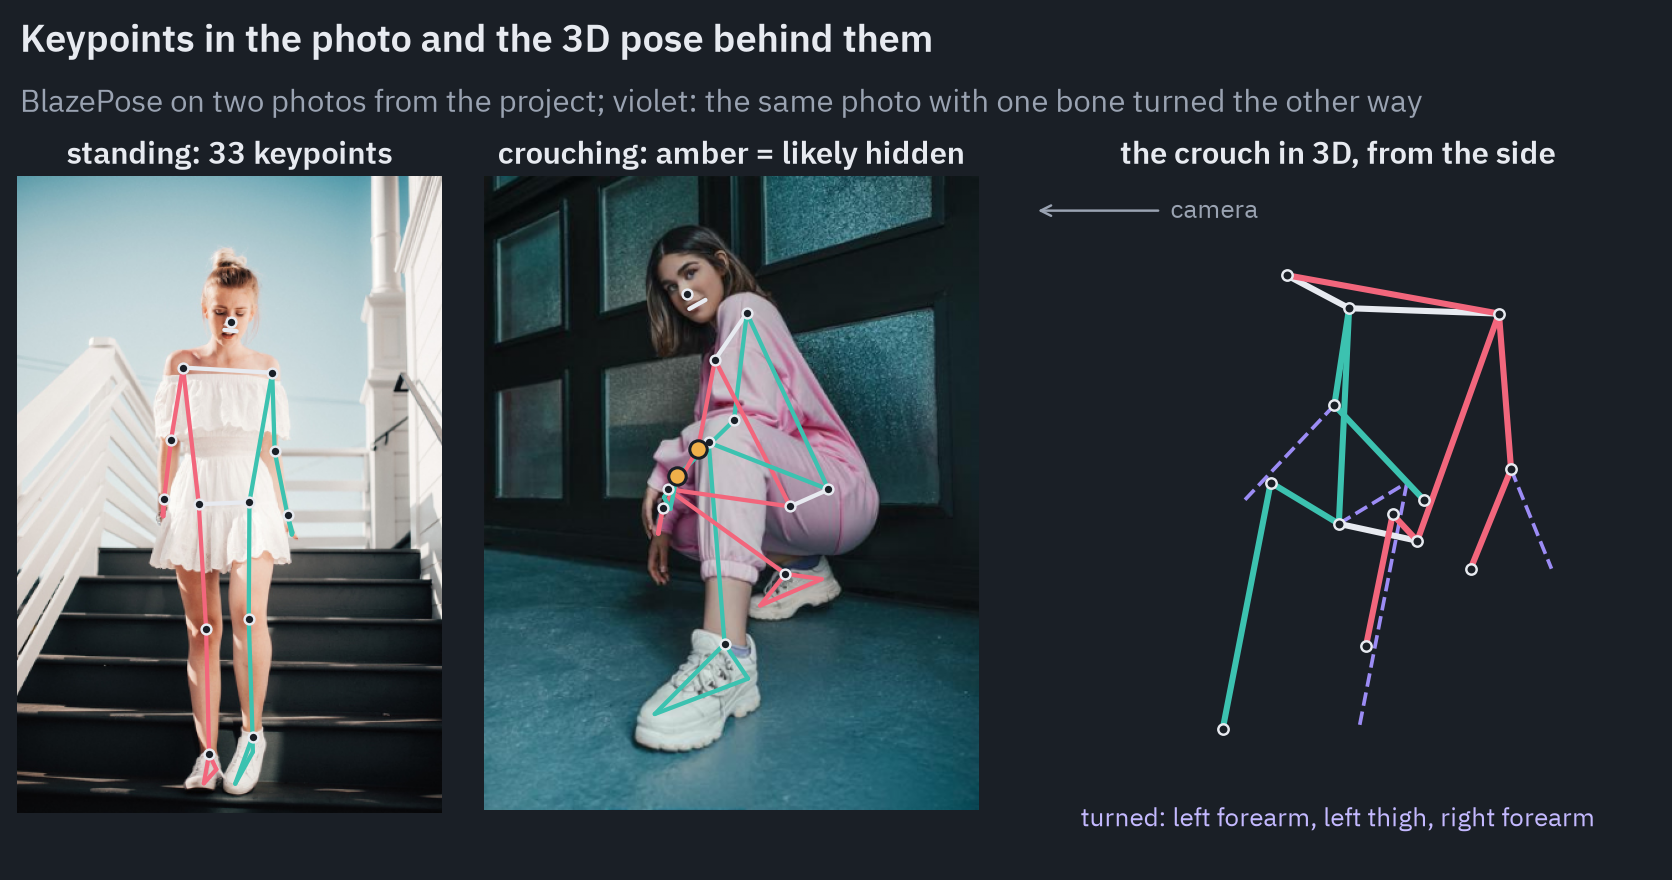
BlazePose also estimates the 3D positions of its points. On the standing photo depth barely matters, because the limbs lie almost in the plane of the photo.
In the crouch the thighs and forearms point towards the camera. The third panel shows the model’s 3D estimate together with three alternatives that project onto the same keypoints.
Photos that do not work
Many failures in practice came from the photos rather than from the models. The datasets of the time were catalogue photos: VITON-HD collected “frontal-view woman and top clothing image pairs”, and its authors wrote that existing methods, their own included, “do not provide robust performance for in-the-wild images”. Users send other photos.
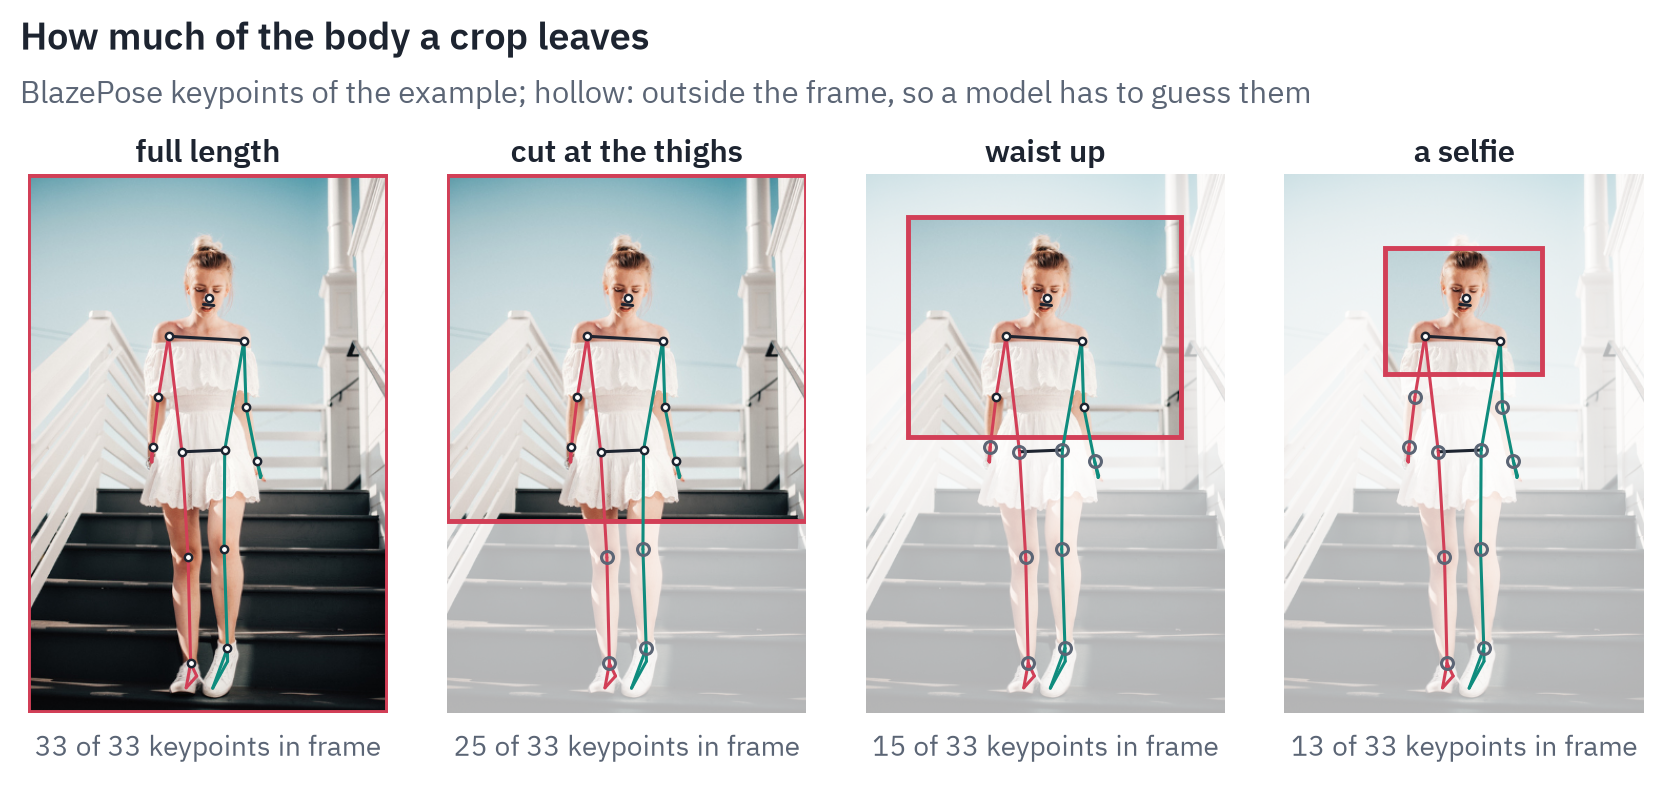
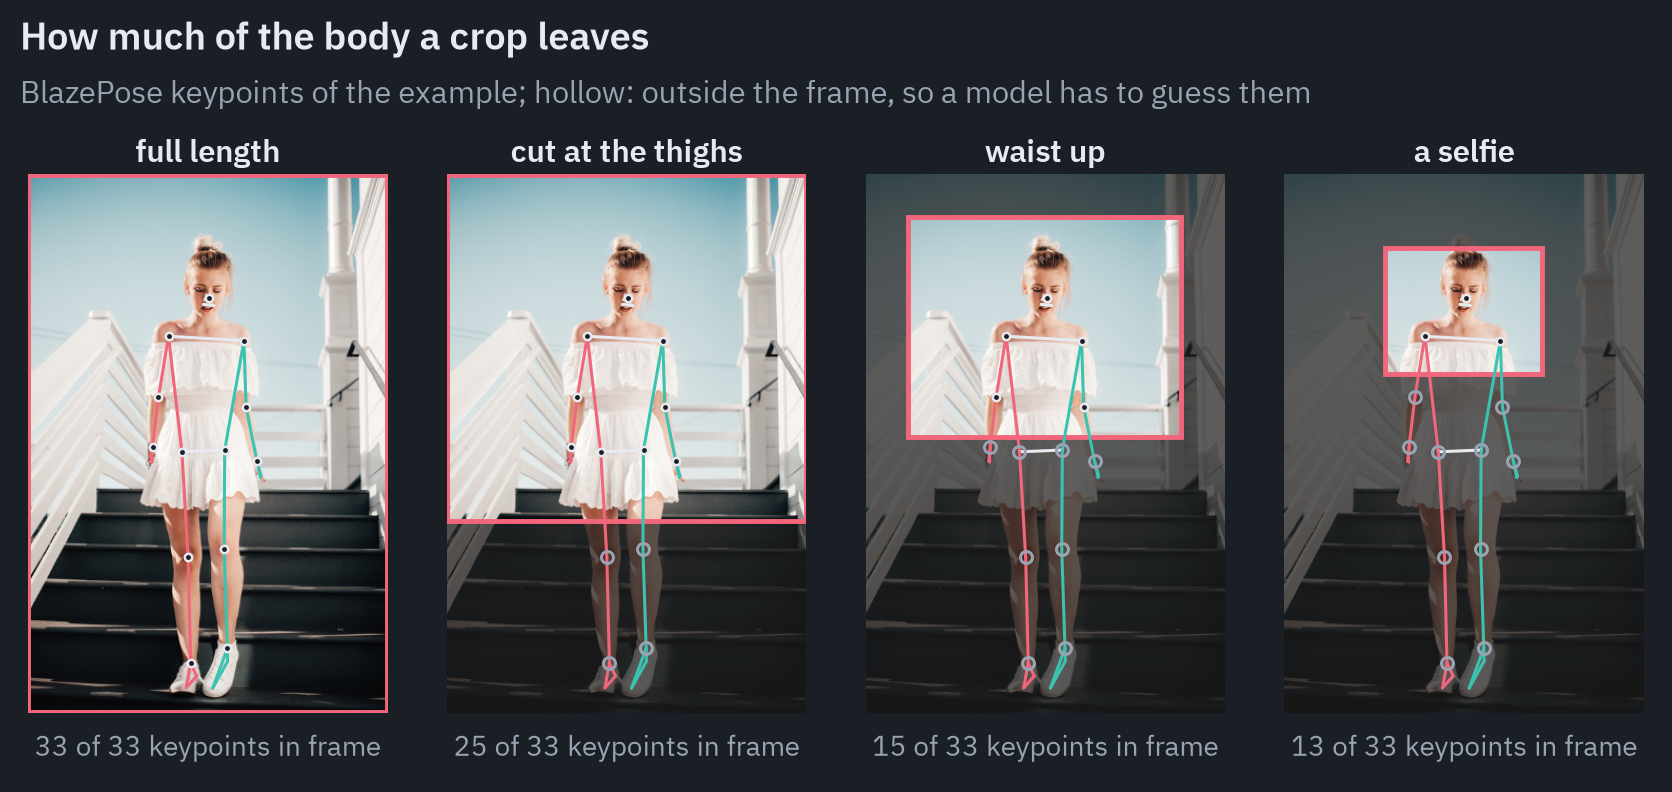
The most common problem was the frame. A dress or trousers need the legs, and when the knees are cut off, the model has to invent both the legs and the place where the hem ends. In the figure a crop at the thighs leaves 25 of the 33 keypoints, and a crop at the waist leaves 15.
Selfies were worse. A photo at arm’s length shows the head and shoulders, 13 keypoints out of 33, through a wide-angle lens that enlarges whatever is closest to it. In a mirror selfie the phone and the arm holding it cover the torso, exactly where the new garment has to go.
Then there is occlusion: hands in pockets, crossed arms, bags, long hair over the shoulders, a friend in the frame. The garment has to go behind all of it, and the parsing and pose models make more mistakes around it.
HR-VITON’s authors write that results are “significantly impaired when the body parts occlude the garment”[17]. In the crouch above, the pose model itself marks the right elbow and the left wrist as likely hidden.
Sitting, crouching, and side and back views were rare in the training data. A loose sweater or a coat hides the body shape that 3D try-on needs. All of this is why the photo was checked on the phone before upload, as the section on system design describes.
Image-based try-on
Garment warping
The product photo shows the garment flat, from the front, without a person. Before generation it has to be moved and bent to where the body is.
The classic tool for this is the thin-plate spline. Matching points are marked on the product and on the person: shoulders, waist, hem. The spline is the smoothest map of the plane that carries each point exactly onto its partner:
\[f(\mathbf{x}) = \mathbf{a} + A\mathbf{x} + \sum_{i=1}^{n} \mathbf{w}_i \, U\big(\lVert \mathbf{x} - \mathbf{p}_i \rVert\big), \qquad U(r) = r^2 \log r .\]The first two terms are an affine map: shift, rotation, scale and shear. The sum adds a smooth bump around each control point \(\mathbf{p}_i\).
The weights \(\mathbf{w}_i\) come from a linear system. It sends each \(\mathbf{p}_i\) to its partner and keeps the bending energy, the integral of the squared second derivatives of \(f\), as small as possible. The name comes from a thin metal plate pinned at the points, which bends into the same shape[18].
CP-VTON made the spline learnable. A network looks at the person and the product and predicts the offsets of a 5×5 grid of control points, 2×5×5 = 50 numbers in total[19]. The figure does the same by hand, with 14 points on the project’s example.
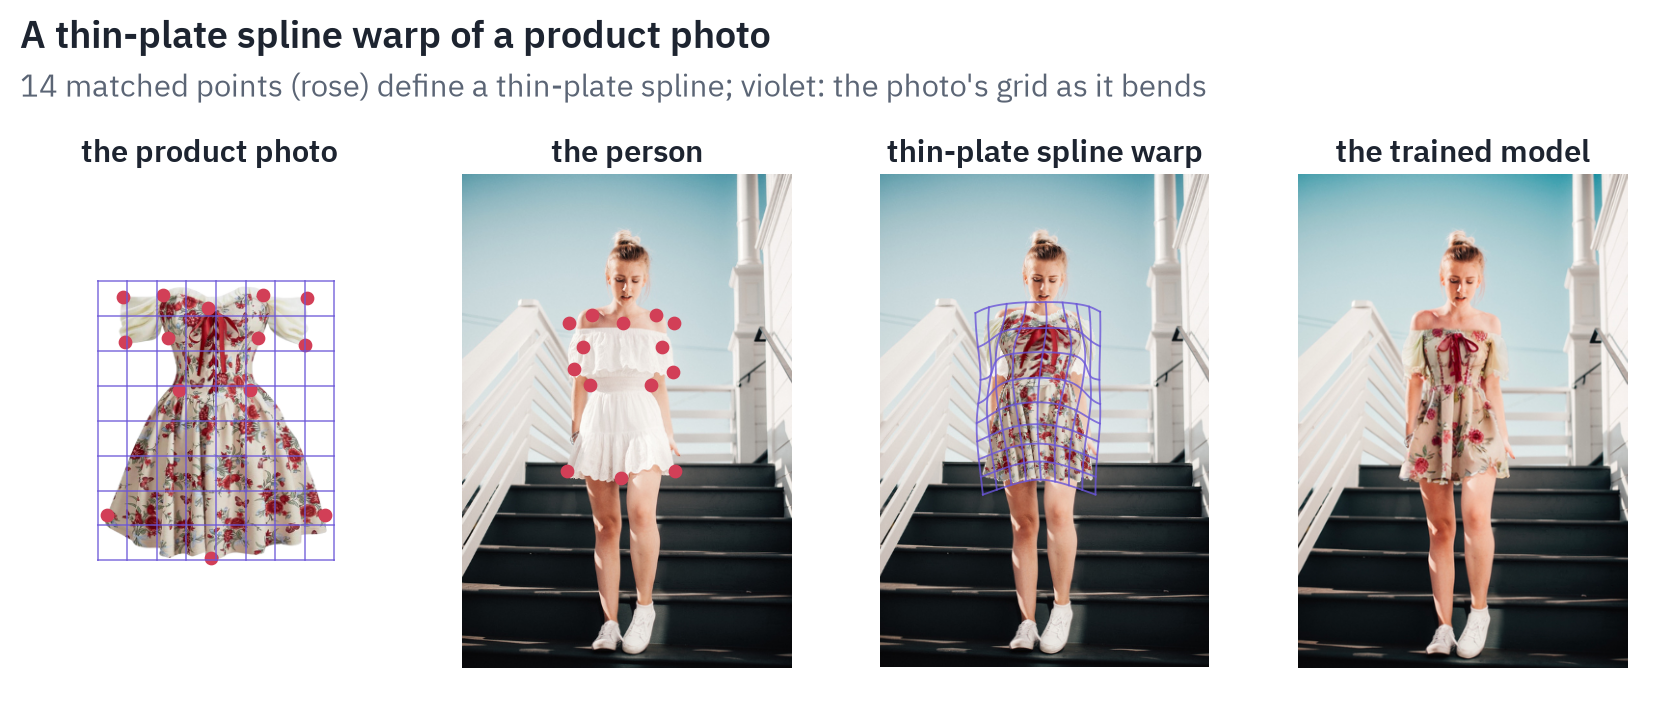
The third panel shows what a warp alone cannot do. The fabric is bent in the plane of the picture, not in space, so there is no shading where it turns away from the camera. The old white dress still shows around the new one.
The puffed sleeves are squeezed flat instead of gathered. Anything in front of the garment, a hand or a strand of hair, would simply be painted over.
The papers of the time name the same limits. TPS has “limited degrees of freedom” for “highly non-rigid deformation”[20], and where the body hides part of the garment, warping causes “pixel-squeezing artifacts”[17].
The fourth panel shows what a trained model makes of the same inputs. It uses the warped garment as a hint and repaints the region: the old dress is removed, the sleeves follow the arms, and the light matches the scene.
Training data
In 2021 the repainting model was a GAN. VITON-HD, the first to work at high resolution, generated 1024×768 images and was trained on 11,647 pairs of a product photo and a person wearing that product[9].
Such datasets have no photos of the same person in the same pose in two different garments. So models are trained on reconstruction: the garment in a photo is masked, and the model gets the product photo of the same garment and has to paint it back. In use, the product photo shows a different garment.
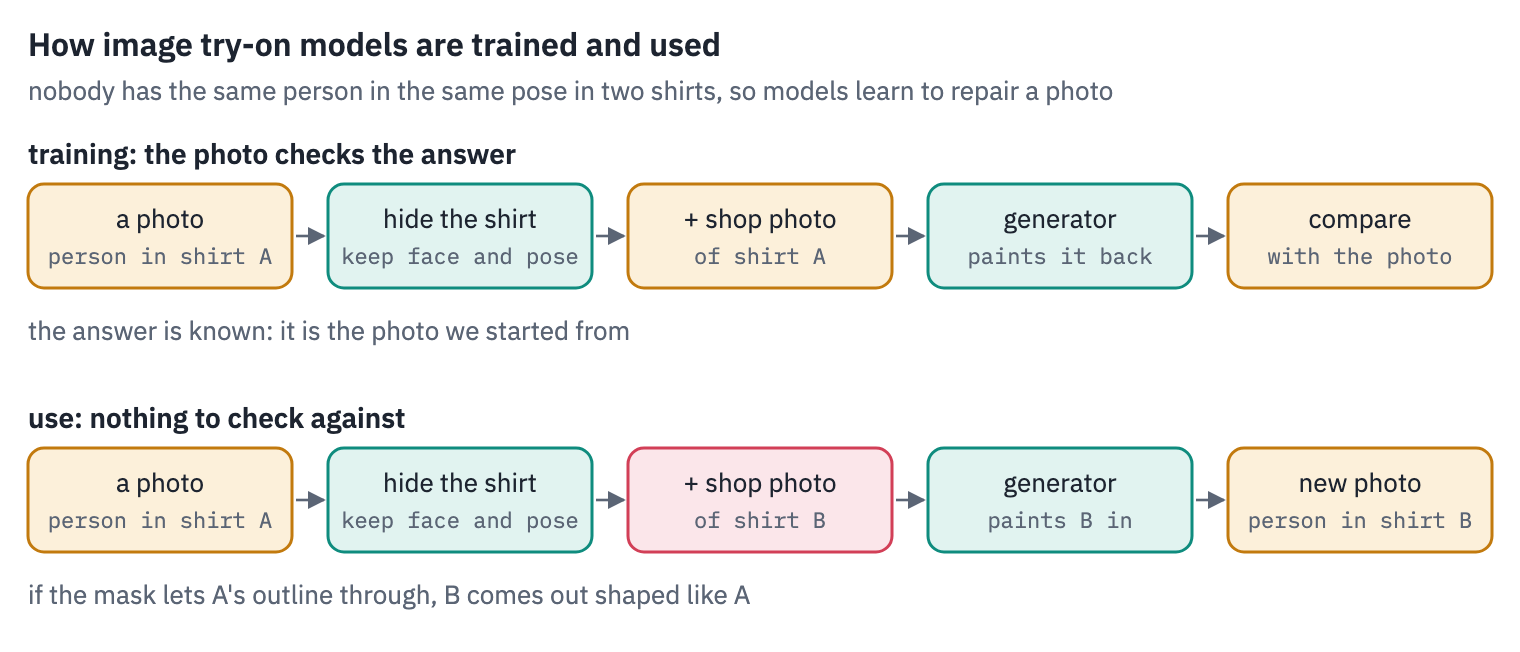
This difference between training and use explains a common failure. If the mask follows the outline of the old garment, the model learns to rely on that outline, and in use the new garment comes out in the shape of the old one. This is what the clothing-agnostic masks prevent.
Inpainting with diffusion
Stable Diffusion went public on 22 August 2022 with open weights, trained “on 512x512 images from a subset of the LAION-5B database”[21] (code).
An inpainting version followed in October. It takes a photo, a mask and a text prompt, and its UNet “has 5 additional input channels (4 for the encoded masked-image and 1 for the mask itself)” (model card).
A model trained on that much data already knows how fabrics, skin and light look, which a GAN trained on twelve thousand pairs did not. Turning it into try-on still took several decisions.
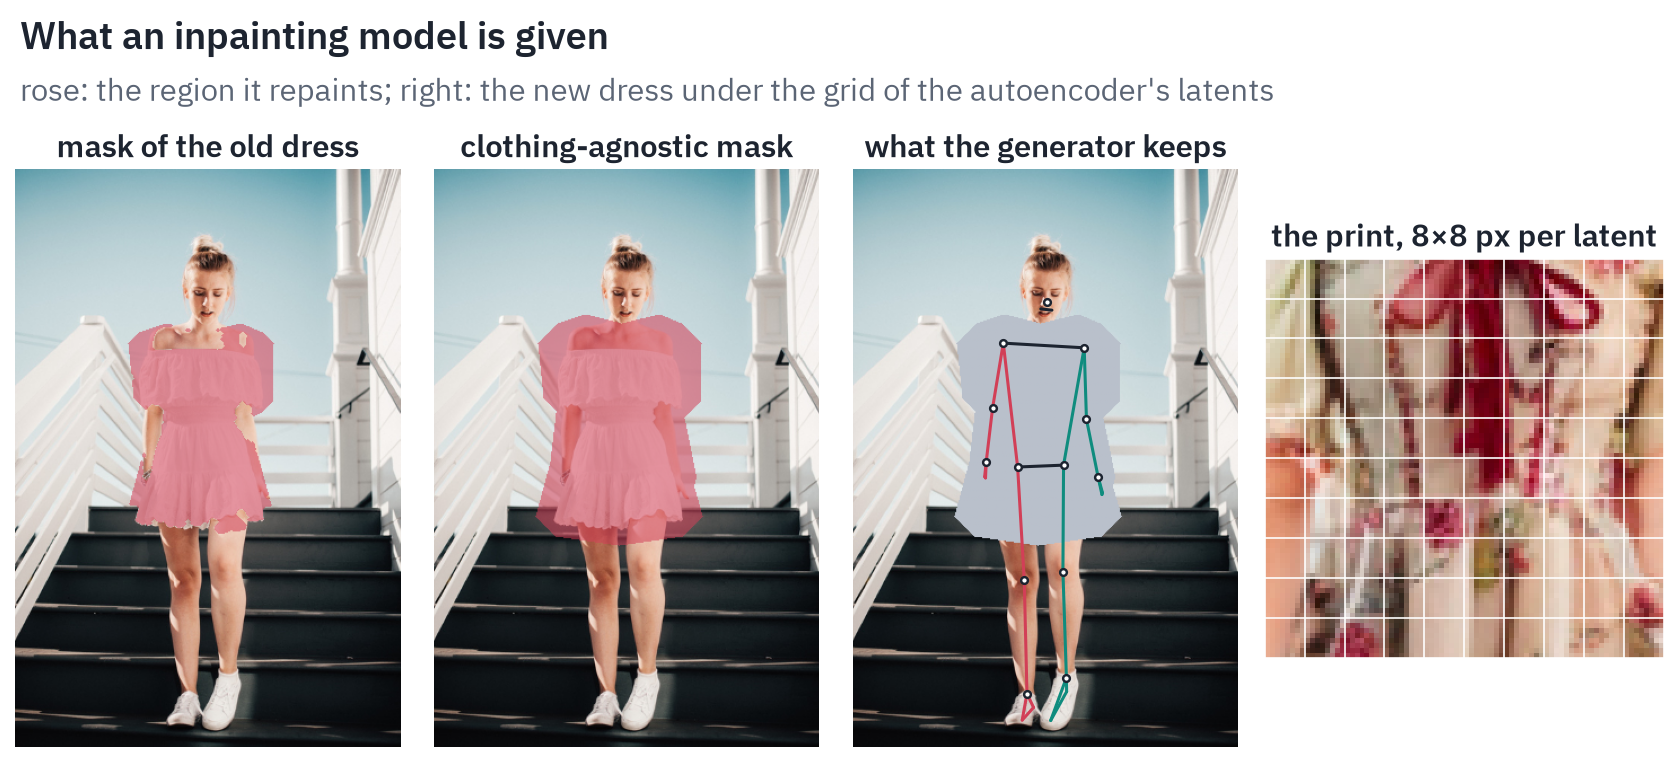
The first decision is the mask. It has to cover where the new garment will be, not where the old one was. A dress replacing shorts needs the legs masked, and a T-shirt replacing a long-sleeved top needs the arms masked, because the model has to paint skin there.
A tight mask would also hand the old outline to the model, so the mask is a generous clothing-agnostic region, as in the second panel.
What stays outside the mask, the face, hair, hands and background, should stay untouched. The autoencoder slightly changes even the pixels it was not asked to change, so after generation the original pixels are pasted back outside the mask.
The garment itself is the hardest thing to get in. A prompt like “a floral dress with puffed sleeves” gives a floral dress, not the one in the shop, so the garment has to enter as an image.
It can be warped onto the body as a starting point, passed through an image encoder as in Paint by Example[22] (code), or taught to the model by fine-tuning on the product’s photos, as in DreamBooth[23] and Textual Inversion[24].
With a large mask the model may also move the arms. ControlNet, released in February 2023, holds the generator to a skeleton, edges or a segmentation; its OpenPose model “was trained on 200k pose-image, caption pairs”[25] (code; model).
Resolution limits the detail. The autoencoder of Stable Diffusion 1.x turns each 8×8 block of pixels into one latent, so on a full-length photo 512 pixels tall a flower of the print is one or two latents wide, as the last panel shows.
Fine prints, logos and text come out blurred; LaDI-VTON’s authors write that “high-frequency details may not be accurately represented”[26]. The usual fix is to generate on a crop around the garment and paste the result back into the photo.
Finally, every random seed gives a different result, while the same photo and garment should give the same picture every time. Either the seed is fixed, or several candidates are generated and the best one is kept, at several times the cost.
Over the project I fine-tuned both kinds of generator, GANs first and then Stable Diffusion. With GANs most of the work went into getting a result that looks like a photo at all.
With diffusion the result looked like a photo from the start, and the work moved to keeping the garment, the face and the body the same as in the inputs.
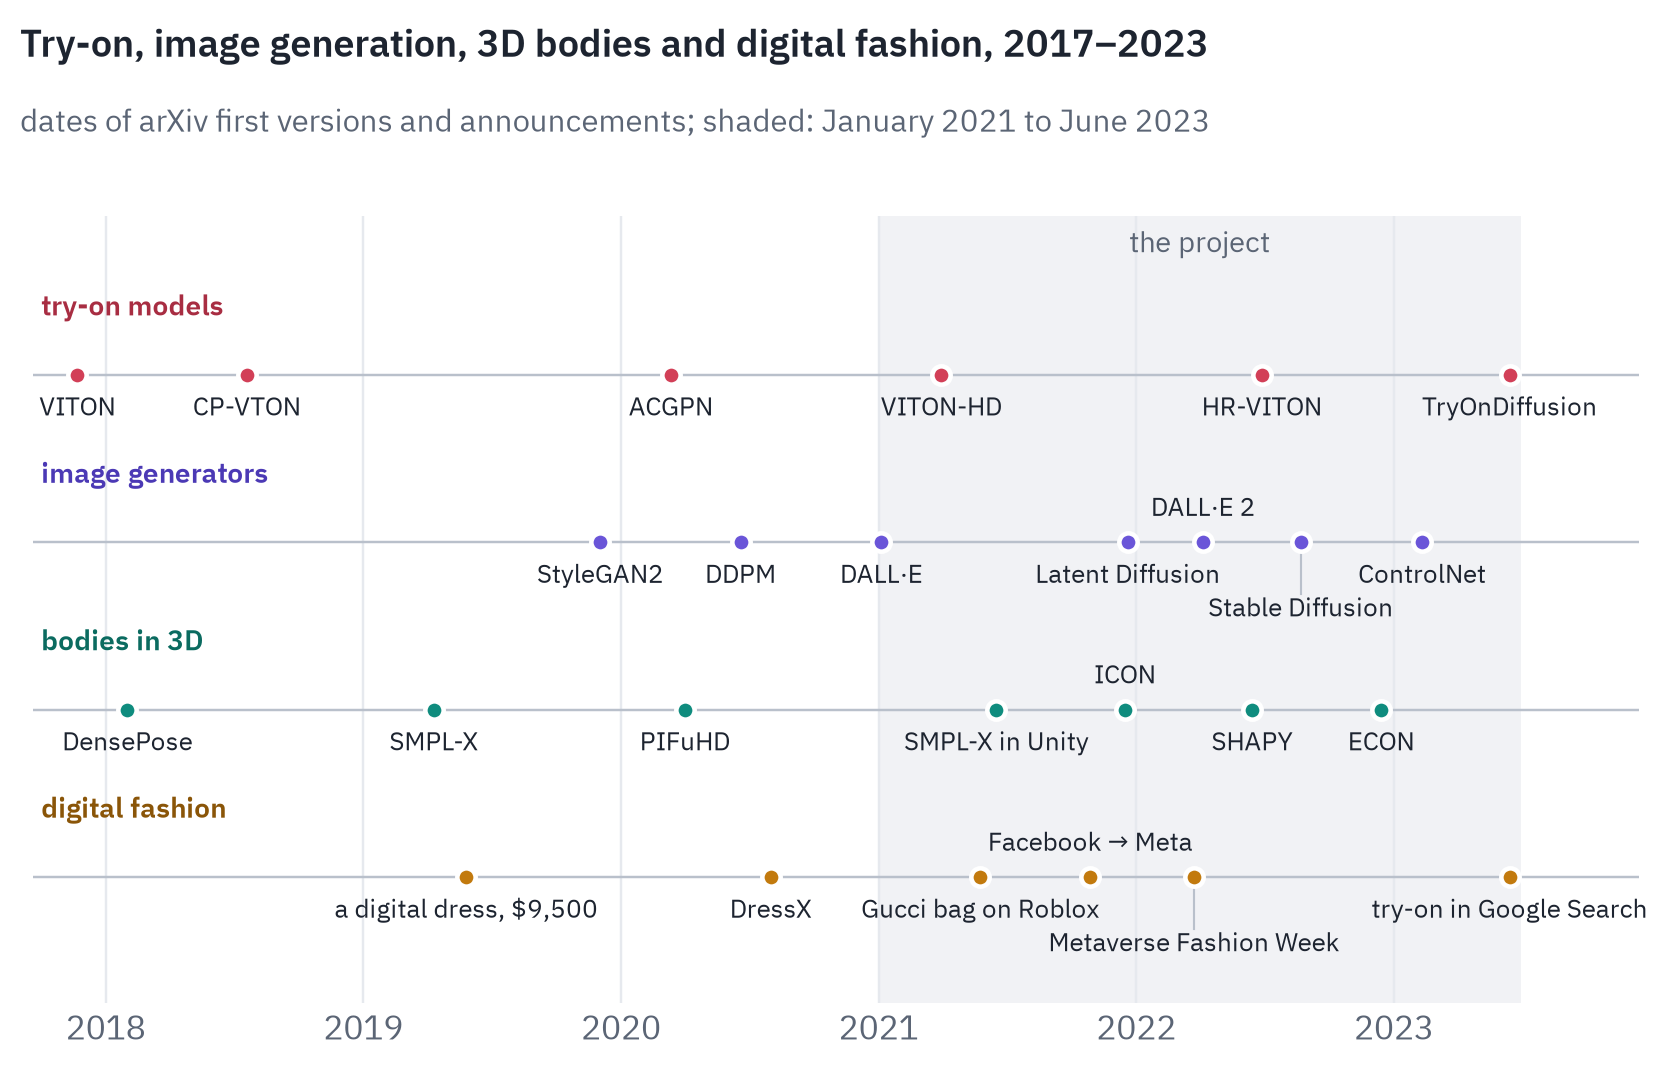
The field changed during the project. OpenAI showed DALL·E on 5 January 2021, the month I started[27].
On 14 June 2023, the month I left, Google added virtual try-on to Search[28]. It runs on a diffusion model (how it works), and its paper, TryOnDiffusion, argued that “the sequence of finding displacements, warping, and blending often creates artifacts”[29].
That sequence is the pipeline described above. TryOnDiffusion warps the garment “implicitly via a cross attention mechanism” and was trained on 4 million pairs of the same person in the same garment in different poses.
3D try-on
The body in a game engine
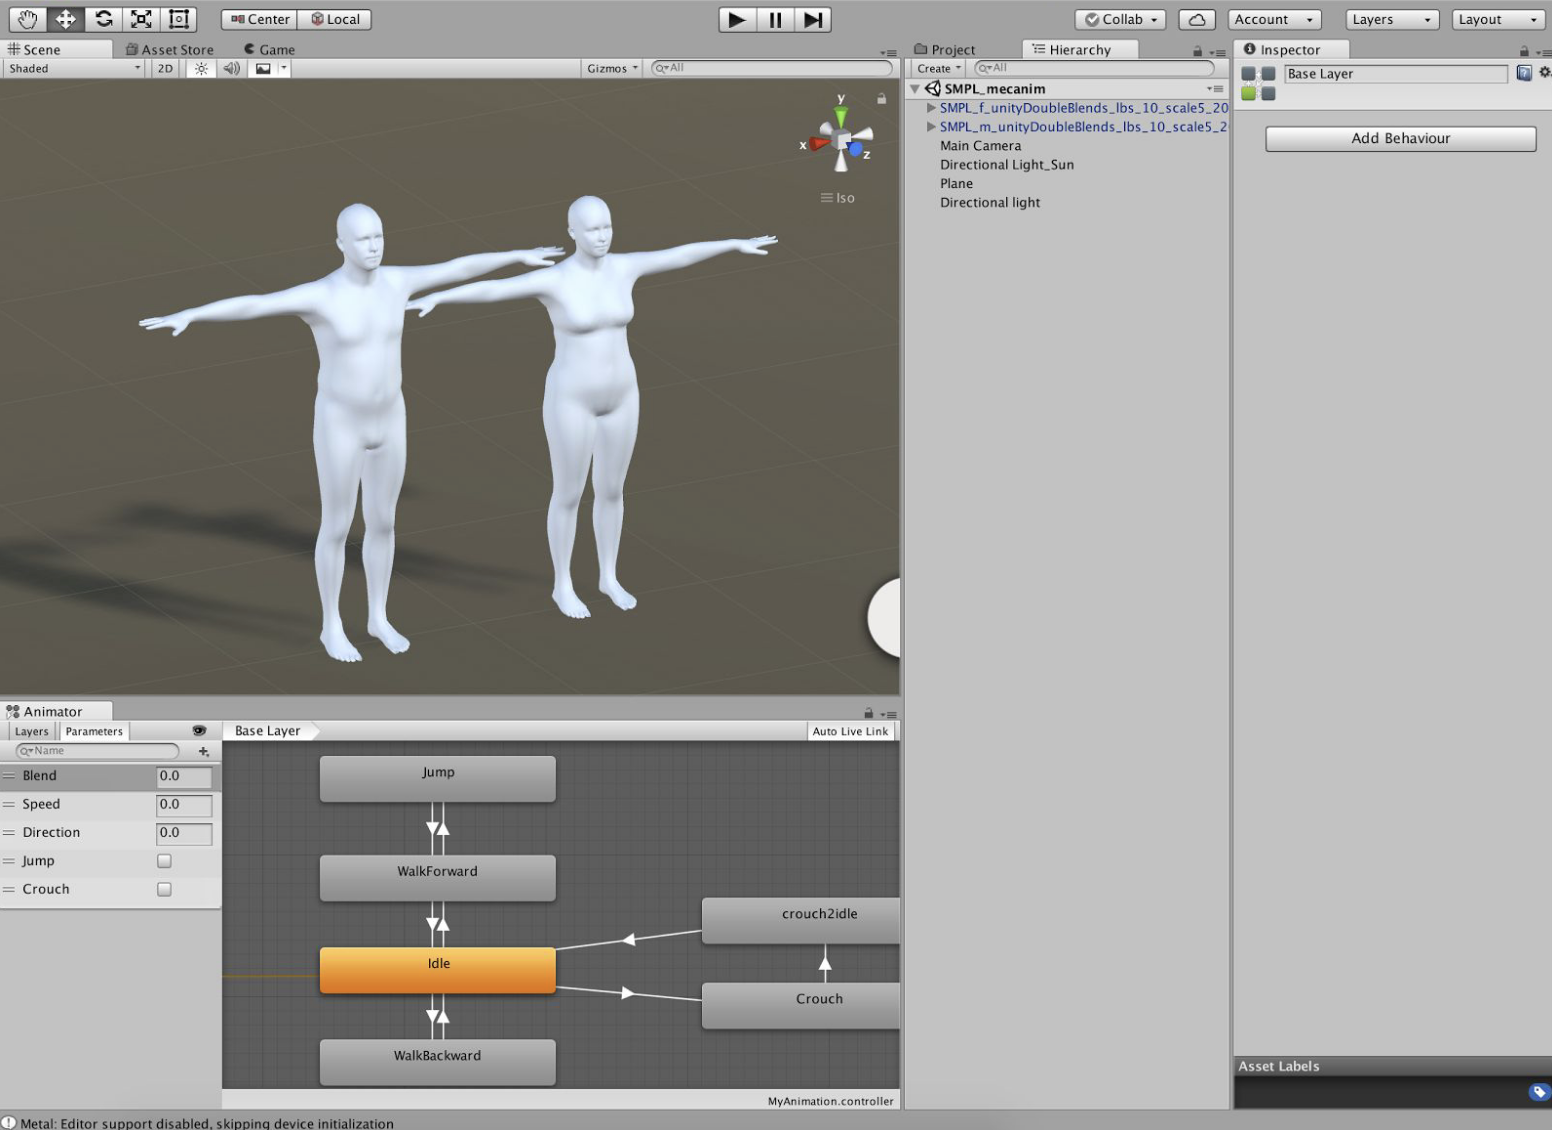
SMPL's female and male bodies in Unity, from the project, driven by an ordinary game animation controller.
A fitted body is useful for a product only if it can be rendered and animated. SMPL comes with code for Unity, and an SMPL-X integration for Unity appeared in June 2021 (SMPL-X). In a game engine the body can walk, turn and be lit, and the scene can run on a phone.
SMPL’s licence covers “non-commercial scientific research” and excludes “incorporation in a commercial product”; companies are pointed to commercial licences sold through Meshcapade (SMPL licence). The bodies in my figures below are from MakeHuman instead, whose assets are in the public domain under CC0 (MakeHuman).
Measurements
Fit needs the numbers a size chart uses: bust, waist and hips. A mesh does not come with them, so they have to be measured.
The mesh is cut with a horizontal plane. Each triangle the plane crosses gives a short segment, and the segments join into closed loops: one around the torso and one around each arm. The torso loop is the one to measure.
A tape measure does not follow the hollow between the breasts or the small of the back; it stretches across them. So the girth is the perimeter of the convex hull of the cross-section, the shortest closed curve around it.
Where to cut depends on the measurement. The waist is the narrowest level of the torso, the hips the widest level below it, and the bust the level where the chest comes furthest forward. Each is a small search over heights, here in steps of half a centimetre.
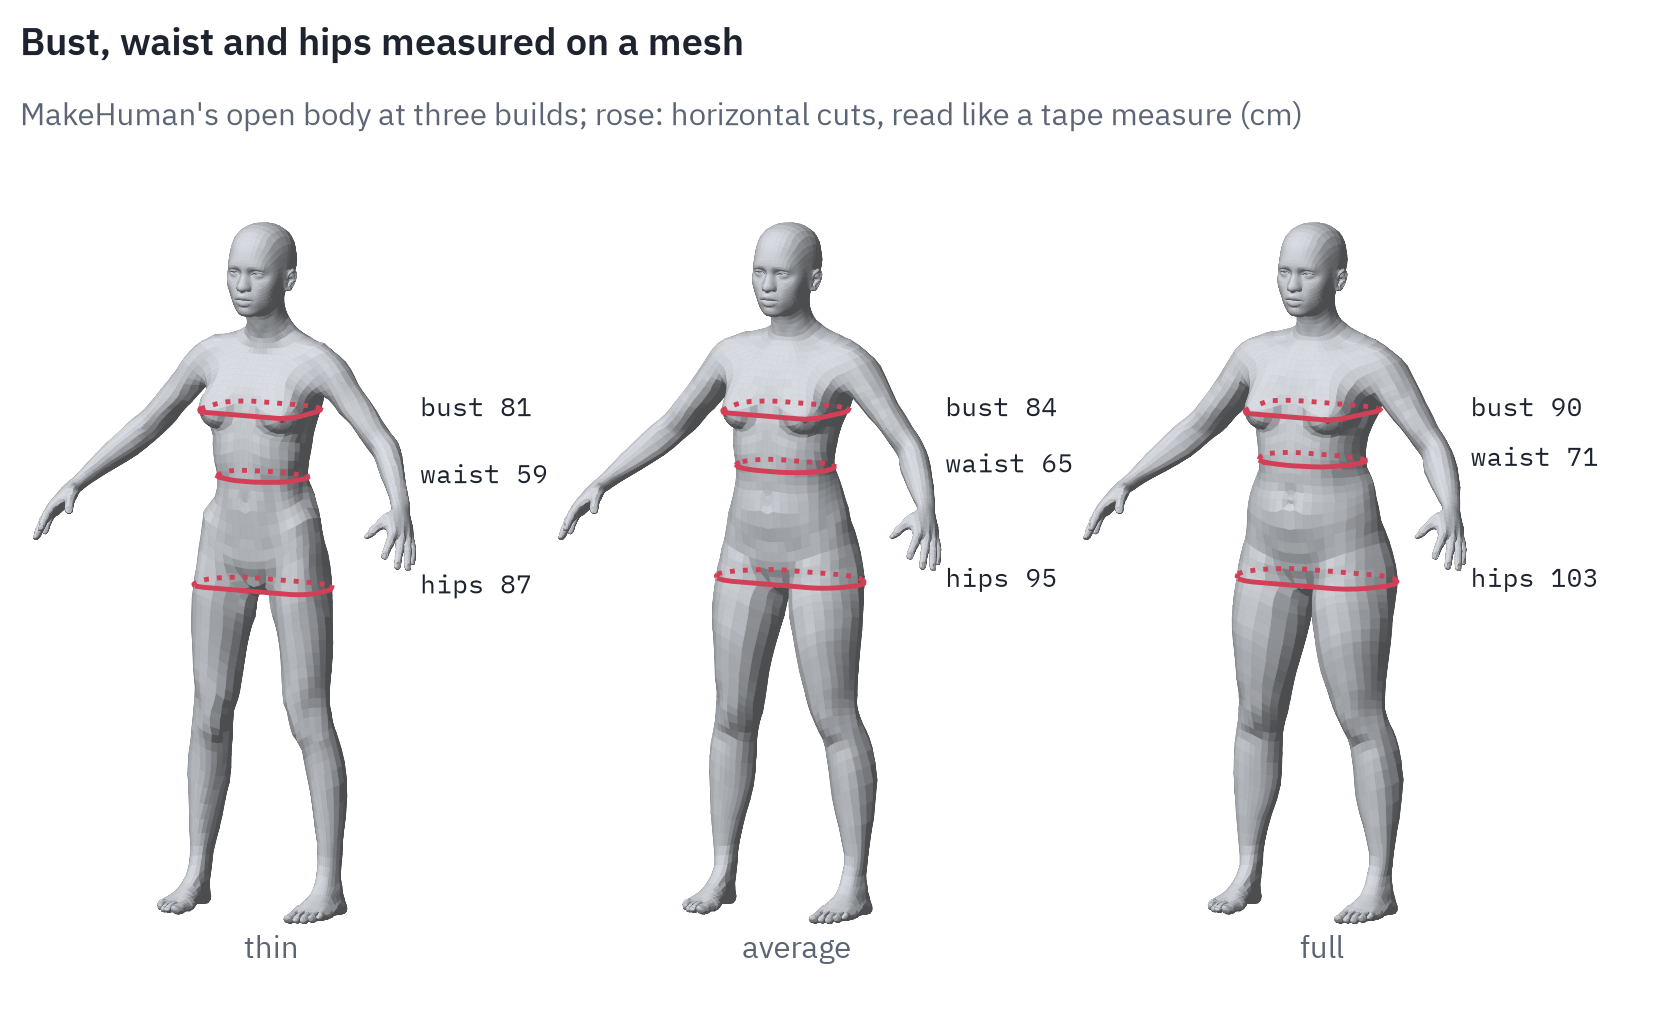
From the thin body to the full one the girths grow by about 9 cm at the bust, 11 cm at the waist and 16 cm at the hips. The next figure shows where on the body this growth happens.
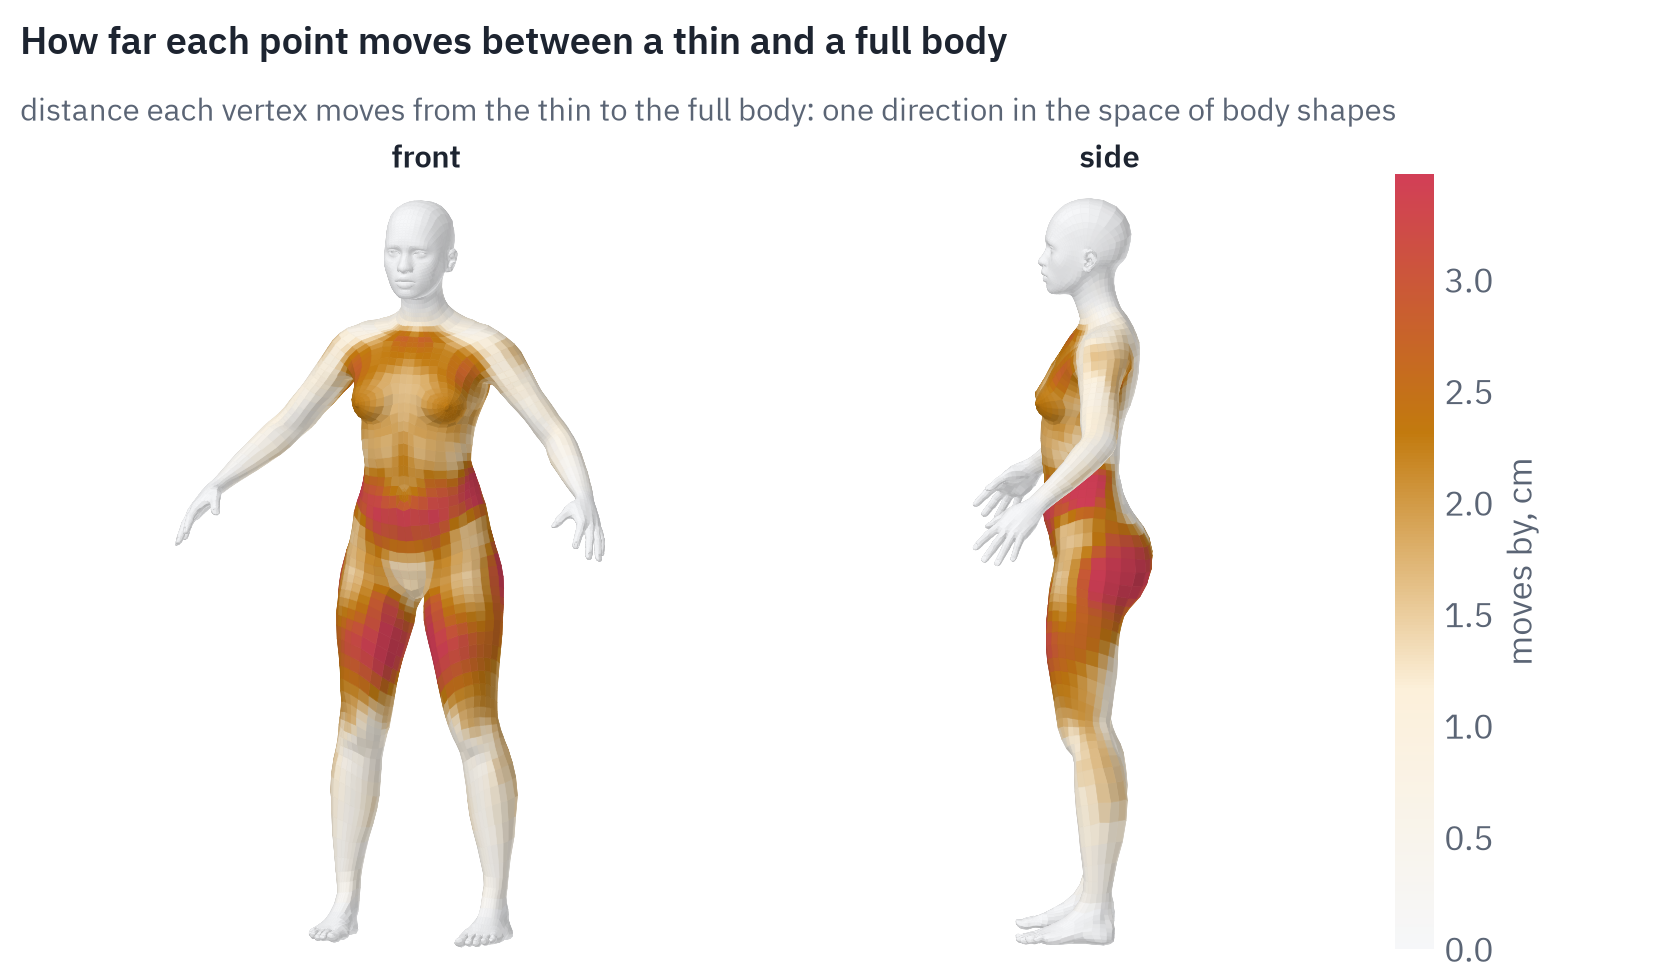
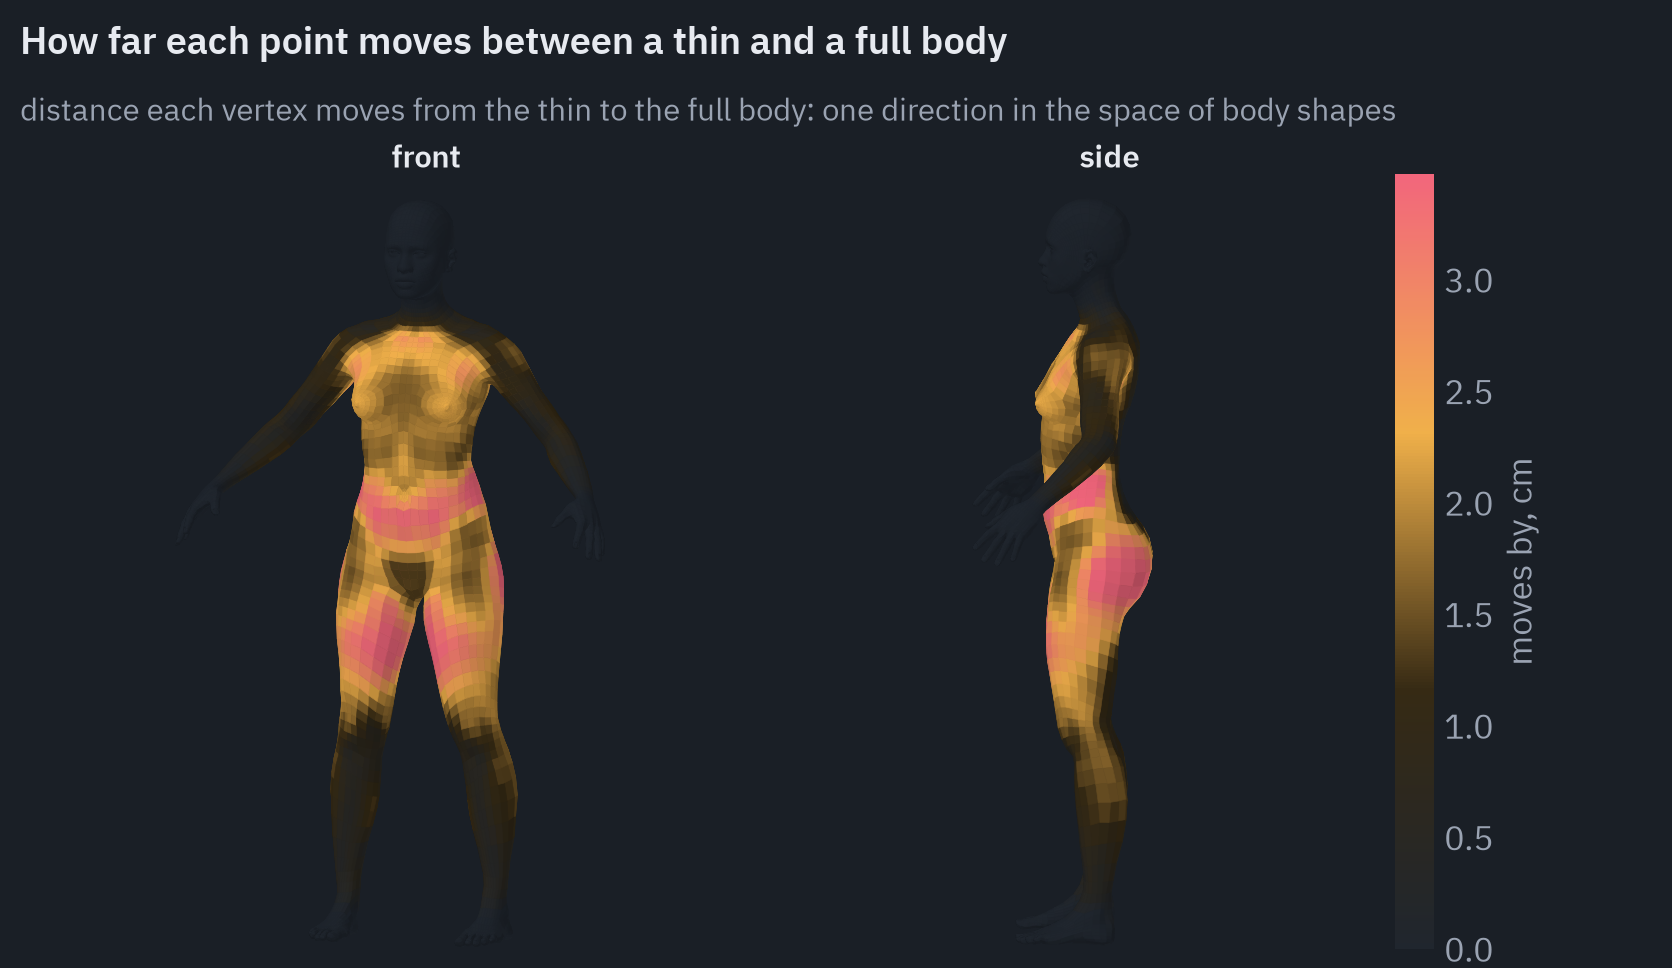
The belly, hips and thighs move by up to about 3.5 cm; the head, hands and feet hardly move.
These are the parts of the body that clothes cover, which makes body shape hard to estimate from a photo. A person in a loose sweater shows their face, hands and shoes clearly and their waist not at all.
SHAPY (2022), a method built for this task, estimated body shape from a single photo with average errors of 6.5 cm at the chest, 6.9 cm at the waist and 5.7 cm at the hips[30] (code).
That is more than half of the whole difference between my thin and full bodies, so measurements entered by the user are a useful input alongside the photo.
Cloth and digital garments
A 3D garment is a mesh cut from flat pattern pieces and sewn together in software, in programs such as CLO 3D or Marvelous Designer. To put it on a body it is simulated: gravity pulls, the fabric resists stretching and, a little, bending, and it must not pass through the skin.
Position-based dynamics turns each of these rules into a constraint on the positions of the mesh’s vertices. Two neighbours \(i\) and \(j\) that were \(L\) apart on the pattern should stay \(L\) apart:
\[C(\mathbf{x}_i, \mathbf{x}_j) = \lVert \mathbf{x}_i - \mathbf{x}_j \rVert - L = 0 .\]Every time step moves the vertices freely under gravity, then corrects their positions, constraint by constraint, until the rules hold again[31].
In plain PBD the cloth gets stiffer the more correction iterations are run. XPBD fixes this by giving each constraint a compliance \(\alpha\), the inverse of stiffness, and computing each correction as
\[\Delta\lambda = \frac{-C - \tilde\alpha \lambda}{\nabla C \, M^{-1} \nabla C^{\top} + \tilde\alpha}, \qquad \tilde\alpha = \frac{\alpha}{\Delta t^2} .\]Here \(\lambda\) is how hard the constraint has pushed so far, and \(M\) holds the vertices’ masses. With the compliance in the denominator the cloth behaves the same “regardless of iteration count”[32].
Silk and wool both resist stretching; they differ in bending. In the simulation below, silk’s bending constraints are compliant and wool’s are rigid.
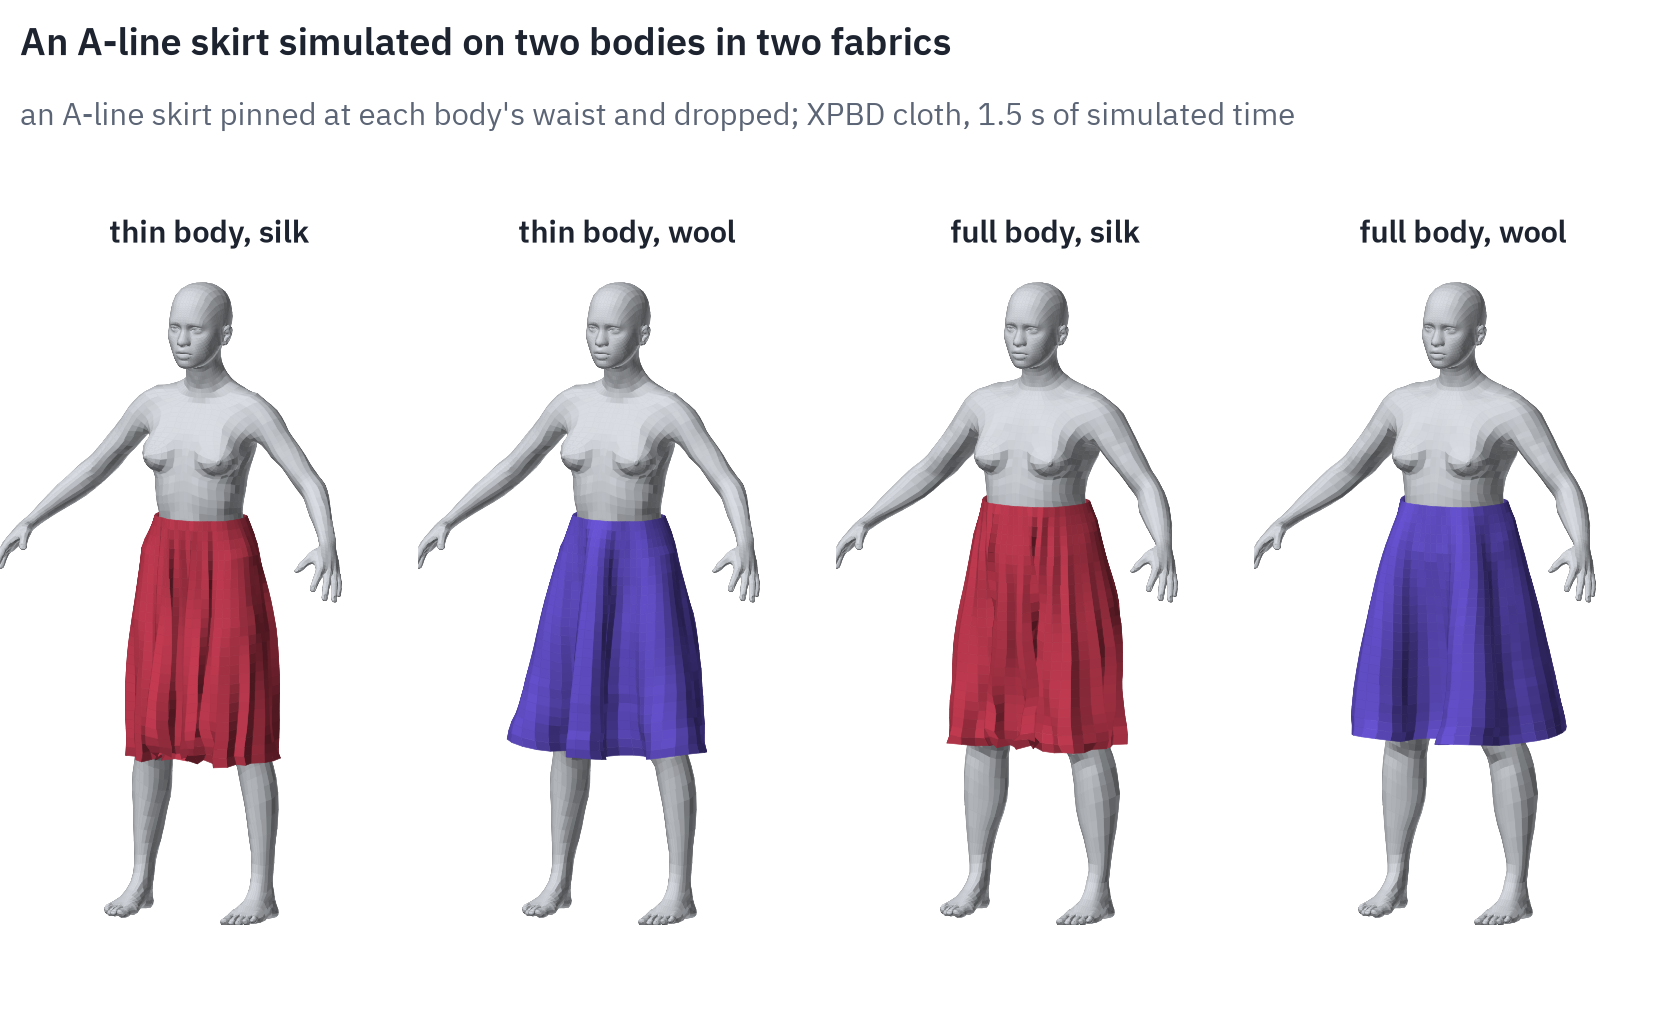
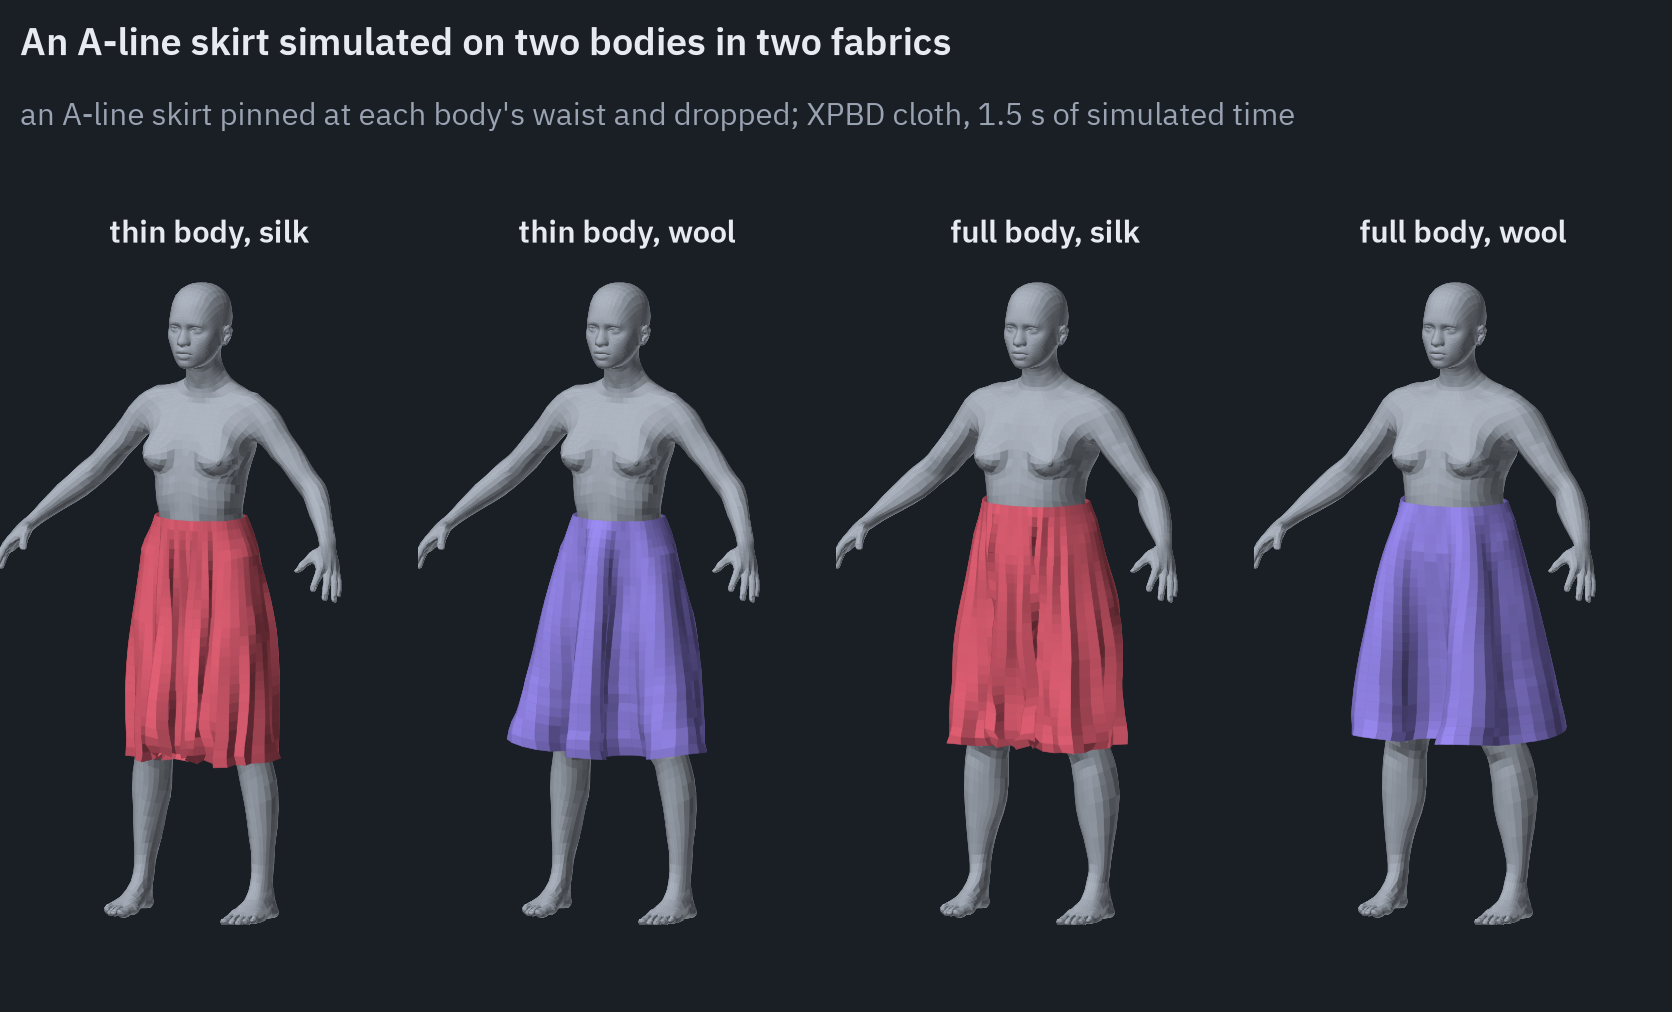
Silk falls in narrow folds along the legs, and wool keeps its A-line shape. On the full body the hips push the skirt outward.
For digital clothing the simulation does not have to stop at real fabrics. Compliances, masses and materials are parameters, so a designer’s garment can hold a shape no fabric would, or be rendered as metal, glass or light, and it still follows the body’s pose and size. The image-based approach has no such parameters.
The practical problems of this approach lay elsewhere. Every garment needs a 3D model, which is natural for a digital outfit but not for a shop that adds thousands of products a season and has only photos of them. Every real fabric needs its stretch and bending measured or guessed.
Simulation is also too slow for an interactive request, so drapes are computed in advance or predicted by a network; TailorNet (2020) predicts them “more than 1000 times faster” than simulating[33] (code). And a body from a game engine next to a real face looks like a game character.
Combining the two
The two approaches fail in different places. Image generation gives realistic light, skin and fabric texture, but it guesses the geometry and ignores size. The 3D pipeline gets the geometry and size right, but its output looks rendered.
We experimented with combining them: the 3D part decides where the garment goes and how it falls, and the image model paints it into the photo.
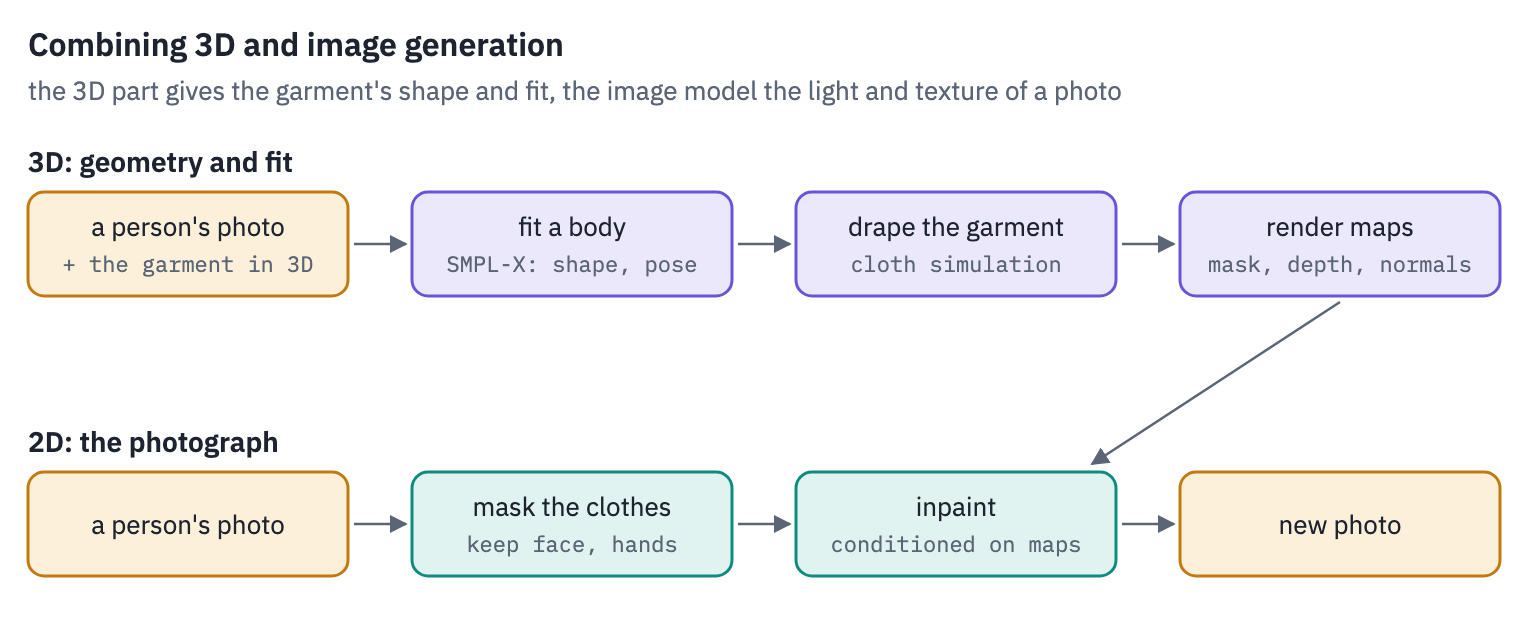
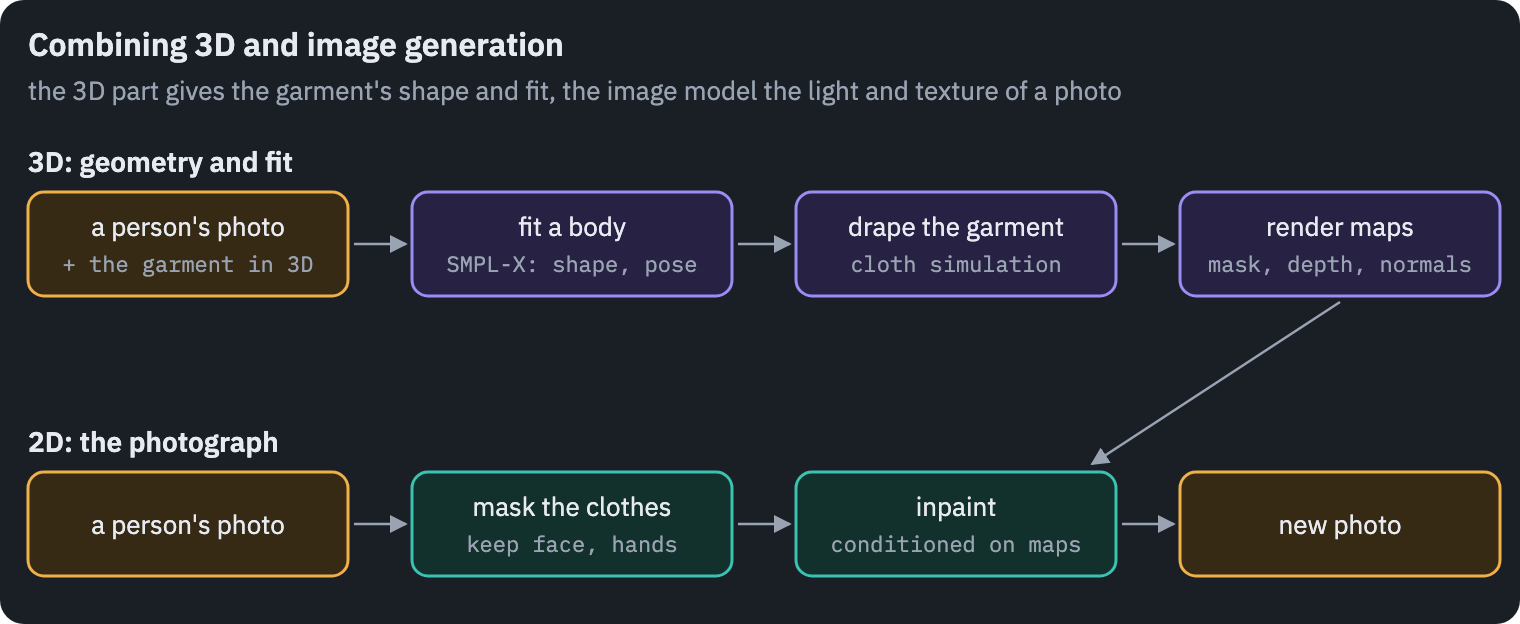
The pipeline starts with the SMPL-X fit from the section on pose and shape. The 3D garment is draped on that body by the cloth simulation, and the result is rendered not as a finished picture but as maps: the garment’s mask, its depth and its surface normals.
A diffusion model then inpaints the masked region of the photo, conditioned on those maps. ControlNet’s first release already included models for depth maps and normal maps (ControlNet).
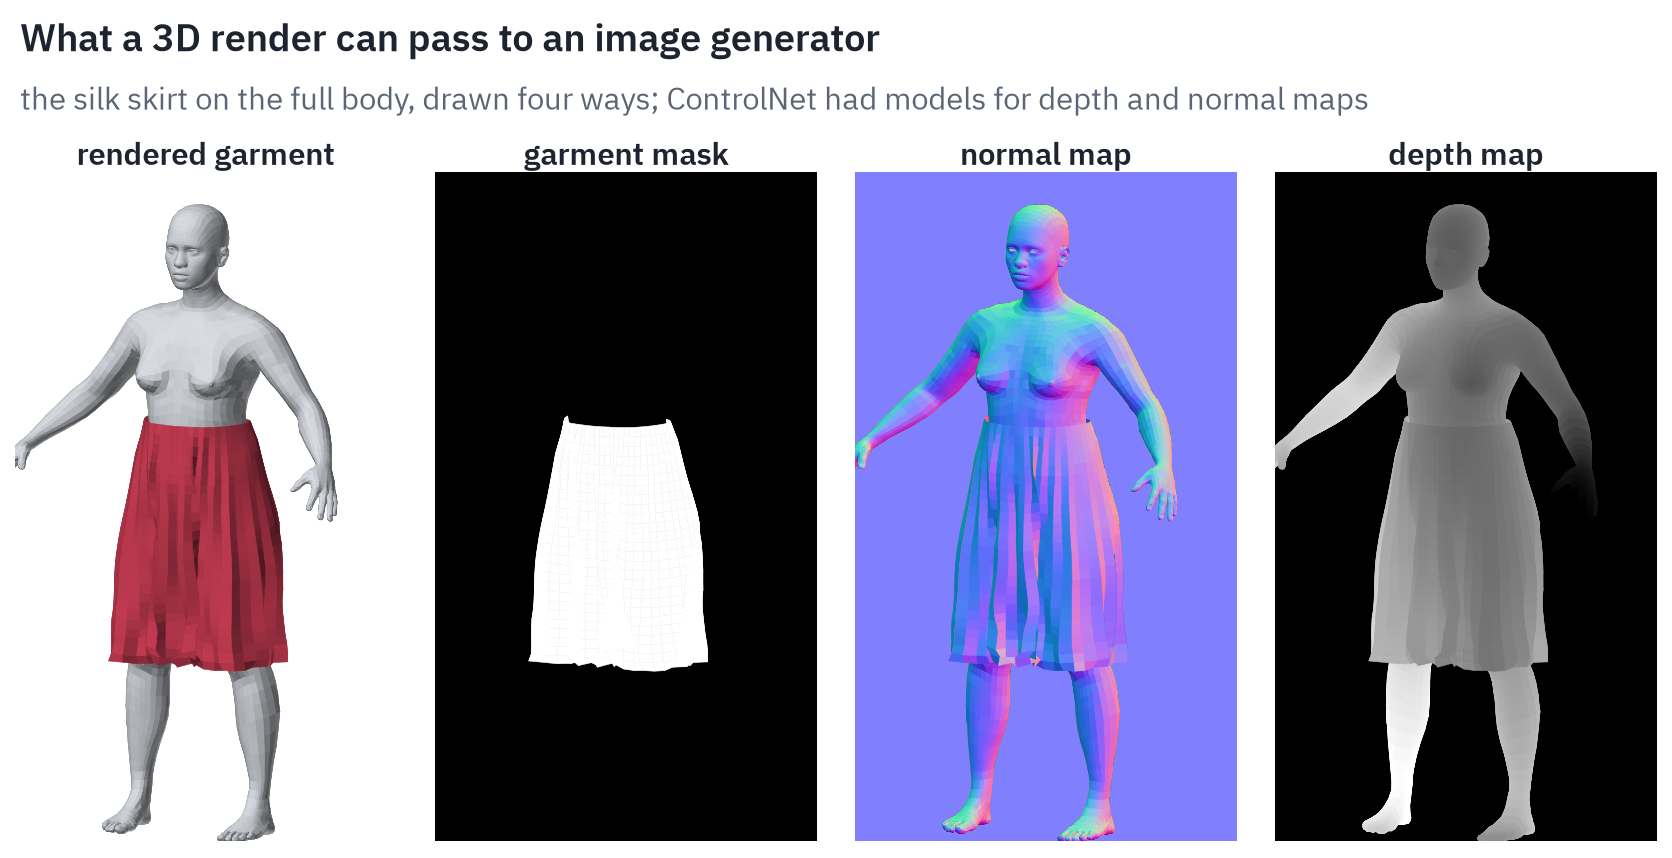
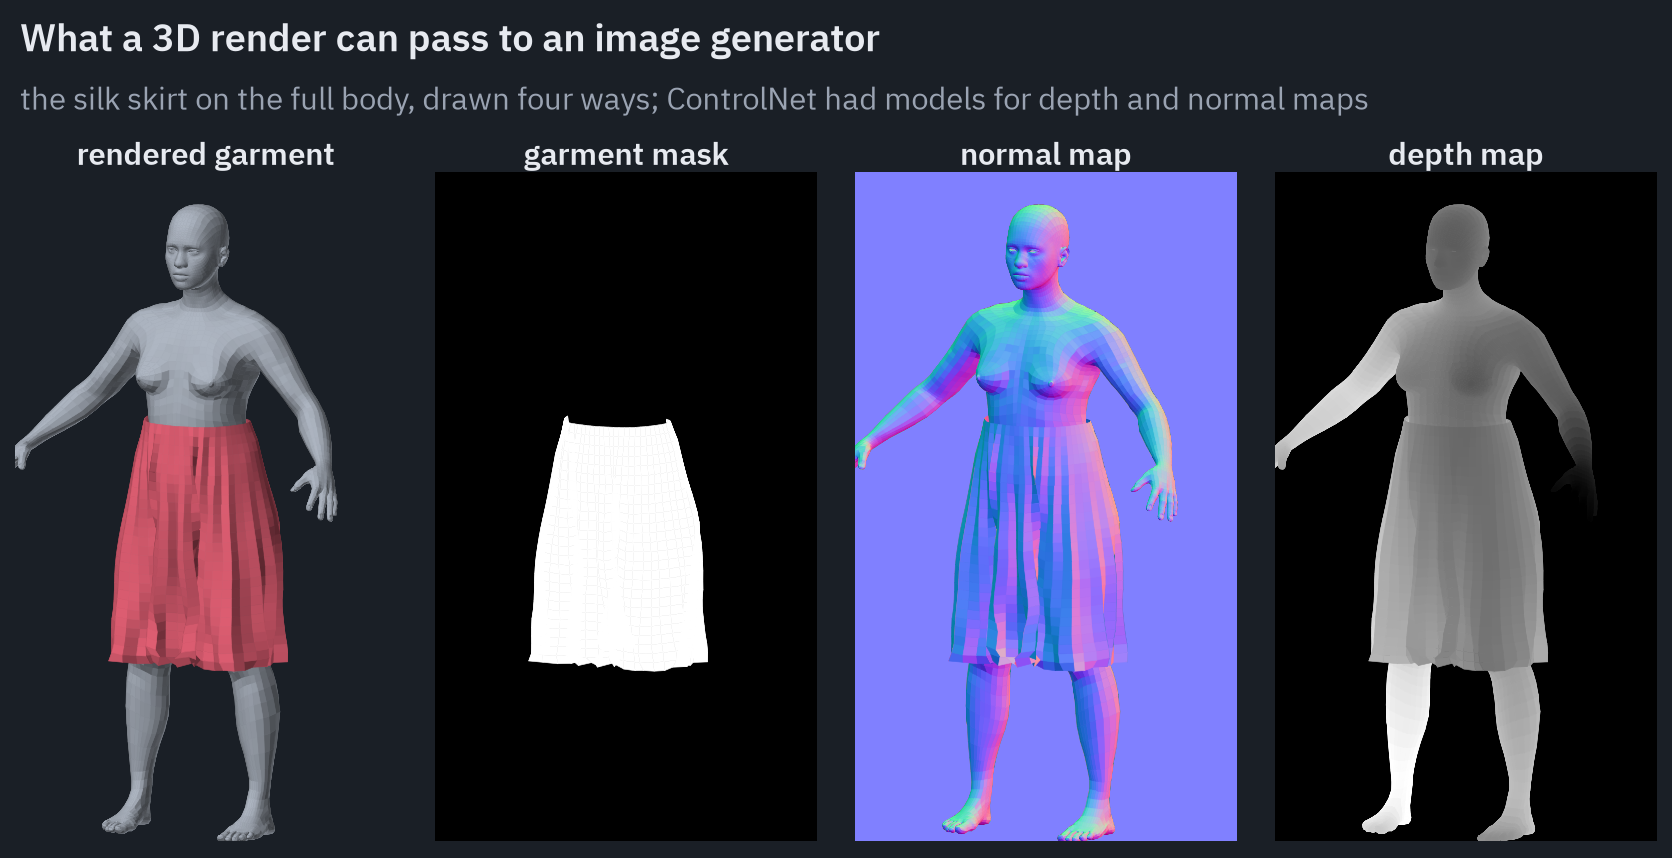
Another variant starts from the render itself. SDEdit adds noise to a rough image and then removes it with a diffusion model, balancing “faithfulness to the user input” against “realism of the synthesized image”[34]. A rendered garment comes out closer to a photo and keeps its shape.
For digital clothing this combination fits well. The shape and the unusual material come from the designer’s 3D model. The integration into the photo comes from the image model: the light, the shadows on the skin, the edges against the background.
The difficulty is consistency. The generator can still move a fold or change a colour that the render had fixed, and two pipelines have to be kept in step.
System design
The models were one part of the product. Around them were mobile apps, a server and a pool of GPU workers, and the clearest way to describe them is to follow one photo through the system.
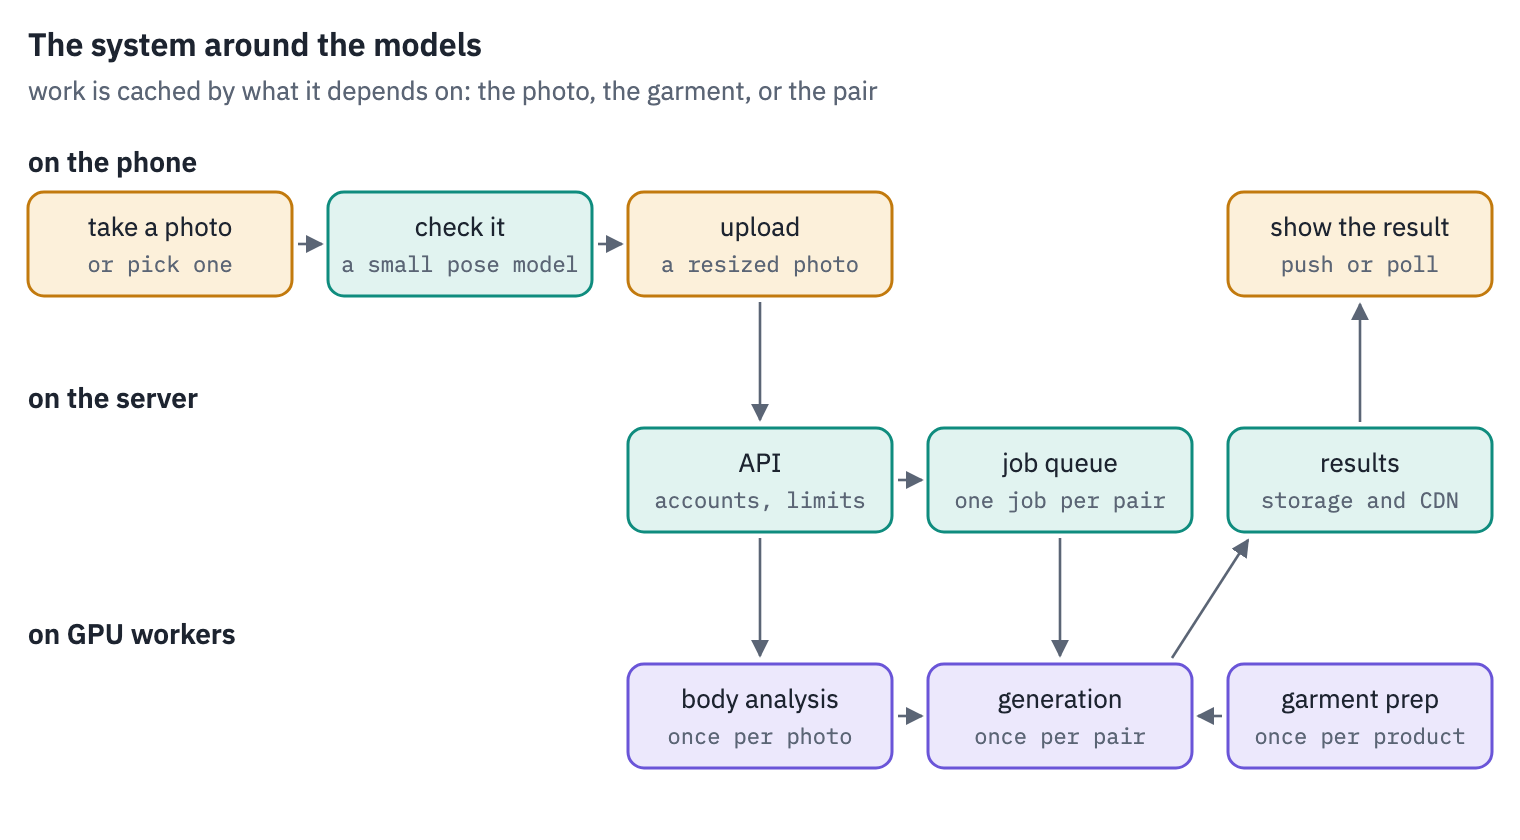
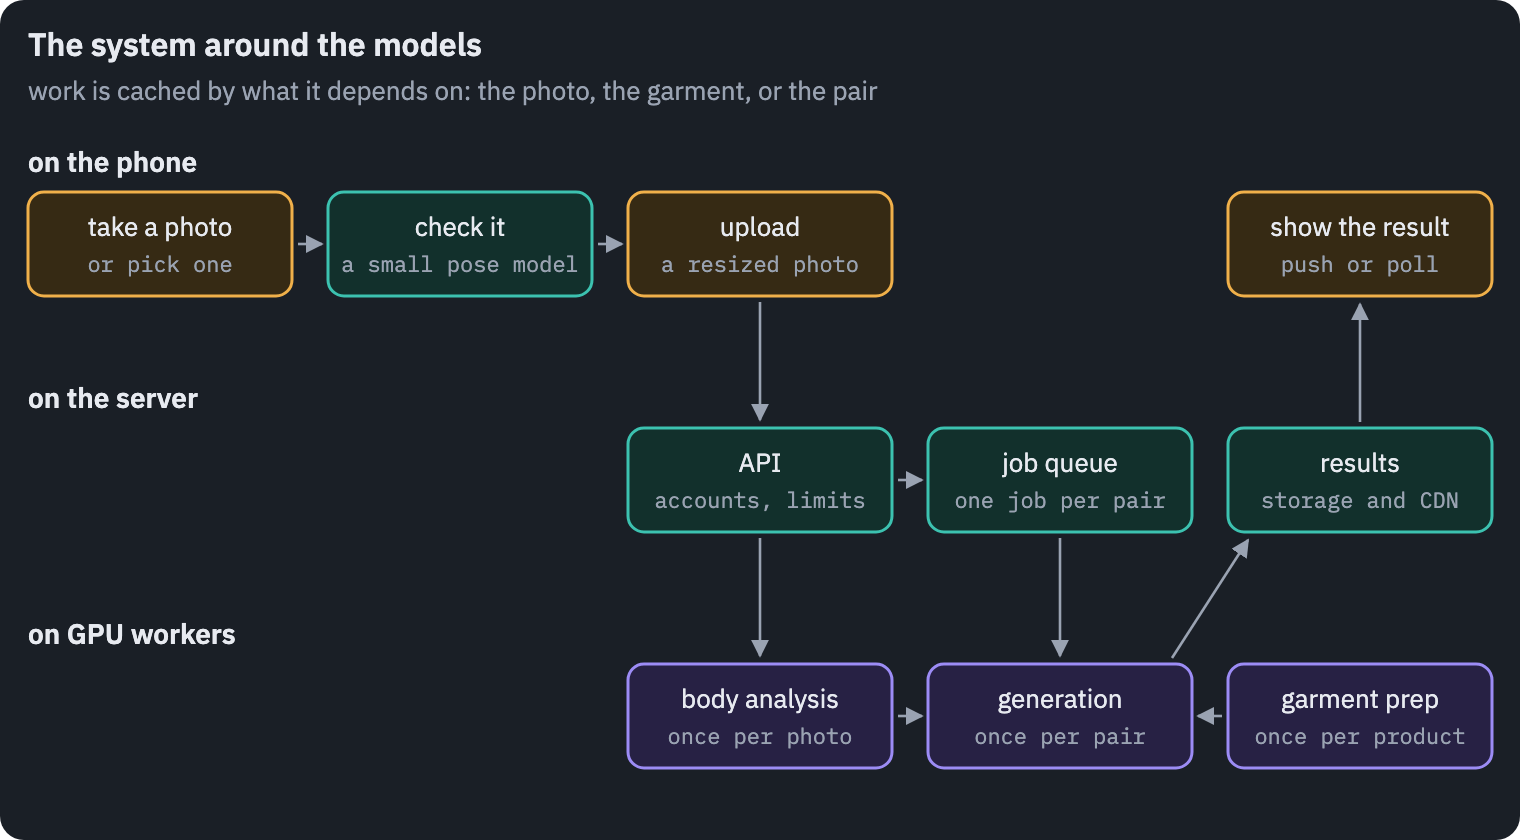
It starts on the phone. The app asks for a full-length photo, facing the camera, arms slightly away from the body, and a small pose model checks the result before anything leaves the device: is there one person, and is the whole body in the frame.
BlazePose was built for this kind of job and “runs at over 30 frames per second on a Pixel 2 phone”[5]. A selfie is turned back on the phone, with a hint about what to fix, before it costs any GPU time.
A photo that passes is resized, compressed and uploaded. From there the work is split by what it depends on. Whatever depends only on the photo, the keypoints, parsing, DensePose and the 3D body fit, runs once, right after upload, often before the user has picked a garment.
Whatever depends only on the garment, the segmented product photo, the 3D model and its drapes, was computed when the product was added to the catalogue. Only generation needs both, so trying one more garment on a known photo costs one generation and nothing else.
That generation is a job in a queue, one per pair of photo and garment. A burst of requests makes the queue longer instead of making requests fail, and the app does not hold a connection open while it waits: the result arrives by a push notification or by polling, and the user keeps browsing.
Finished images go to storage behind a CDN, so asking for the same pair again costs nothing.
Most of the cost was in the diffusion model, and the ways to cut it changed quickly over 2022 and 2023. DDIM had already made sampling “10× to 50× faster” than the original diffusion models[35], and DPM-Solver++ “can generate high-quality samples within only 15 to 20 steps”[36].
Half precision halves the memory. FlashAttention computes exact attention with fewer reads and writes to GPU memory[37], and runtimes such as ONNX Runtime and TensorRT compile the networks for inference.
A crop around the garment at the model’s native resolution is cheaper to generate than the whole photo, and several jobs batched on one GPU use it better than one at a time.
References
- Engadget, 2019. engadget.com. ↩
- Smithsonian, 2019. smithsonianmag.com. ↩
- Narvar, 2022. corp.narvar.com. ↩
- Cao et al. OpenPose: Realtime Multi-Person 2D Pose Estimation using Part Affinity Fields. TPAMI 2019. ↩
- Bazarevsky et al. BlazePose: On-device Real-time Body Pose tracking. CVPR Workshops 2020. ↩
- Li et al. Self-Correction for Human Parsing. TPAMI 2020. ↩
- Güler, Neverova and Kokkinos. DensePose: Dense Human Pose Estimation In The Wild. CVPR 2018. ↩
- Han et al. VITON: An Image-based Virtual Try-on Network. CVPR 2018. ↩
- Choi et al. VITON-HD: High-Resolution Virtual Try-On via Misalignment-Aware Normalization. CVPR 2021. Code. ↩
- Loper et al. SMPL: A Skinned Multi-Person Linear Model. SIGGRAPH Asia 2015. ↩
- Pavlakos et al. Expressive Body Capture: 3D Hands, Face, and Body from a Single Image. CVPR 2019. ↩
- Bogo et al. Keep it SMPL: Automatic Estimation of 3D Human Pose and Shape from a Single Image. ECCV 2016. ↩
- Kanazawa et al. End-to-end Recovery of Human Shape and Pose. CVPR 2018. ↩
- Choutas et al. Monocular Expressive Body Regression through Body-Driven Attention. ECCV 2020. ↩
- Kolotouros et al. Learning to Reconstruct 3D Human Pose and Shape via Model-fitting in the Loop. ICCV 2019. ↩
- Taylor. Reconstruction of Articulated Objects from Point Correspondences in a Single Uncalibrated Image. Computer Vision and Image Understanding, 2000. ↩
- Lee et al. High-Resolution Virtual Try-On with Misalignment and Occlusion-Handled Conditions. ECCV 2022. Code. ↩
- Bookstein. Principal Warps: Thin-Plate Splines and the Decomposition of Deformations. TPAMI 1989. ↩
- Wang et al. Toward Characteristic-Preserving Image-based Virtual Try-On Network. ECCV 2018. Code. ↩
- Ge et al. Parser-Free Virtual Try-on via Distilling Appearance Flows. CVPR 2021. Code. ↩
- Stability AI, 2022. stability.ai. ↩
- Yang et al. Paint by Example: Exemplar-based Image Editing with Diffusion Models. CVPR 2023. ↩
- Ruiz et al. DreamBooth: Fine Tuning Text-to-Image Diffusion Models for Subject-Driven Generation. CVPR 2023. ↩
- Gal et al. An Image is Worth One Word: Personalizing Text-to-Image Generation using Textual Inversion. ICLR 2023. ↩
- Zhang and Agrawala. Adding Conditional Control to Text-to-Image Diffusion Models. ICCV 2023. ↩
- Morelli et al. LaDI-VTON: Latent Diffusion Textual-Inversion Enhanced Virtual Try-On. ACM Multimedia 2023. Code. ↩
- OpenAI, 2021. openai.com. ↩
- Google, 2023. blog.google. ↩
- Zhu et al. TryOnDiffusion: A Tale of Two UNets. CVPR 2023. ↩
- Choutas et al. Accurate 3D Body Shape Regression using Metric and Semantic Attributes. CVPR 2022. ↩
- Müller et al. Position Based Dynamics. Journal of Visual Communication and Image Representation, 2007. ↩
- Macklin, Müller and Chentanez. XPBD: Position-Based Simulation of Compliant Constrained Dynamics. Motion in Games 2016. ↩
- Patel, Liao and Pons-Moll. TailorNet: Predicting Clothing in 3D as a Function of Human Pose, Shape and Garment Style. CVPR 2020. ↩
- Meng et al. SDEdit: Guided Image Synthesis and Editing with Stochastic Differential Equations. ICLR 2022. ↩
- Song, Meng and Ermon. Denoising Diffusion Implicit Models. ICLR 2021. ↩
- Lu et al. DPM-Solver++: Fast Solver for Guided Sampling of Diffusion Probabilistic Models. 2022. ↩
- Dao et al. FlashAttention: Fast and Memory-Efficient Exact Attention with IO-Awareness. NeurIPS 2022. ↩
- Rombach et al. High-Resolution Image Synthesis with Latent Diffusion Models. CVPR 2022.